• Skip to primary navigation
  • Skip to main content
  • Skip to primary sidebar

cros.land

just figuring things out

  • Home
  • AI Powered Game Master Tools
  • Lost Mines of Phandelver Guide
  • Travels With Serpy
  • Contact Me
  • Archives

forge of spells

A DM’s Guide to Wave Echo Cave

July 21, 2021 by Kenji 2 Comments

Crystal Caves
Image Source: “Crystal Caves” by JoshEiten

As a dungeon, Wave Echo Cave poses three challenges to GMs: The immense size of the dungeon’s map, the underwhelming nature of the Forge of Spells, and the lack of challenge that Nezznar the Black Spider presents to a 4th level party.

This post will focus exclusively on the first challenge, as I have already written separate articles about The Forge of Spells and Nezznar the Black Spider. In addition to that, I’ll add some encounters for the journey to Wave Echo Cave as well as suggestions for effectively running some of the areas of the dungeon.

Before Getting to Wave Echo Cave

Since Wave Echo Cave is deep in the Sword Mountains some fifteen miles East of Phandalin, we should probably make it feel like it’s a difficult place to reach. This way, arriving at the Cave feels more like an accomplishment. Here are some potential encounters to use as the party makes their way to the Cave:

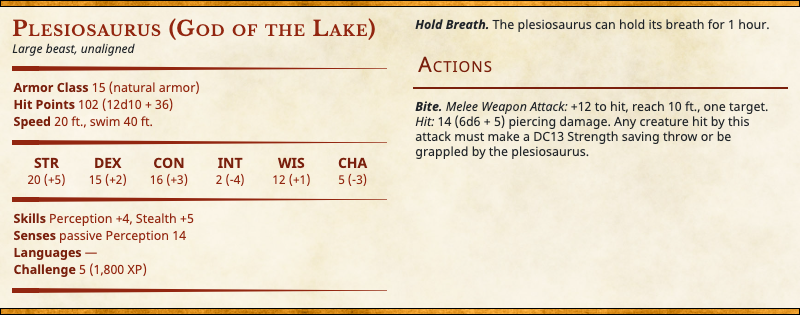
Encounter: The Lake God

To set up this encounter, read the following flavor text:

“There are little more than deer and hunter’s trails leading into the foothills of the Sword Mountains, and it’s certainly slow going as you crest the first ridge and descend into a green valley with streams from the surrounding range filling into a silver lake.”

The PCs can choose to avoid the lake if they wish (This is what the Rockseekers had done). If they get closer to it, however, they notice that there’s a rudimentary altar built by kobolds covered in spatters of blood. This is where kobolds would capture mountain goats and leave them as a sacrifice to what they think is the god of the lake, a giant plesiosaurus.

Should the PCs investigate the altar, the plesiosaurus will emerge from the lake, expecting an offering from the party. If the party offers no beast for the dinosaur to consume, it will attack the party and attempt to drag one PC into the water.

This creature might be a bit too easy for a party of level 4 PCs, so consider using this beefed up stat block:

Or, if you want to create your own custom creature, you can use this 5e statblock generator.

Obstacle: The Broken Bridge

As the party emerges from the valley, they start to notice the remnants of a centuries old road, which, although it has deteriorated quite a bit, it’s far better than the deer trails they were following. Also, this should be an encouraging sign that they’re on the right track, as this is likely the road that once connected Phandalin to Wave Echo Cave.

As they crest the next peak, however, they find themselves facing a large ravine. A massive bridge built by talented Dwarven engineers used to span this gap. Almost all of it, however, has fallen to the depths below. All that’s left is a giant chain nearly 2 feet in width.

Gundren will mention this bridge, saying that his brother used a grappling hook gun to secure a lifeline. When the party arrives at the gap, however, the lifeline has been cut, most likely by servants of the Black Spider.

The DC for crossing the chain is normally a DC 10 dexterity check, but occasionally a fierce wind will rush through the ravine. Should that happen, everyone on the chain will need to make a DC 13 strength check.

Falling from the chain and hitting the ground is fatal. However, we don’t want to make a PCs life depend on a single skill check. Should a party member fail their check, they will fall, but they will also be “rescued” by a roper who manages to grapple the falling PC before they plummet to their death. This roper happens to be on a ledge on the other side of the ravine, some 30 feet below the bridge chain.

Give the Party a Long Rest

If you choose to use these encounters, we want to make sure the party enters the Cave fresh. After the party makes it past the broken bridge, it starts to get dark. They can take a long rest and arrive at the Cave first thing in the morning.

Managing the Size of the Dungeon

While you might have been able to purchase images of the previous dungeon maps, download them, and then print them to scale, you’ll find that for Wave Echo Cave it will be most likely be unmanageable. I did a little napkin math for printing Wave Echo Cave to scale and I got dimensions of roughly 9 x 8 feet, which means it would be larger than most dinner tables! For those who have been printing out their dungeons until this point, Wave Echo Cave forces you to consider other solutions.

Using a “mini-map”

One of the simplest ways to run wave echo cave is in theater of the mind. Really all you need to do is read the flavor text for each area and you’re done. When running the dungeon in theater of the mind, however, you do run the risk of having players losing track of where they are in the sprawling network of caverns. This problem can be mitigated by drawing a “mini-map” as the party progresses.

A “mini-map” is exactly what it sounds like: it’s a “miniature map”. This map doesn’t necessarily need to match the Wave Echo Cave map square by square. I’d probably go nuts trying to draw an accurate miniature version of all the twists and turns in the Mine Tunnels (Area 2). Instead, I’d probably go with a more abstract approach like this:

As you can see, the Mine Tunnels aren’t a 1-to-1 copy of the Mine tunnels from the book.

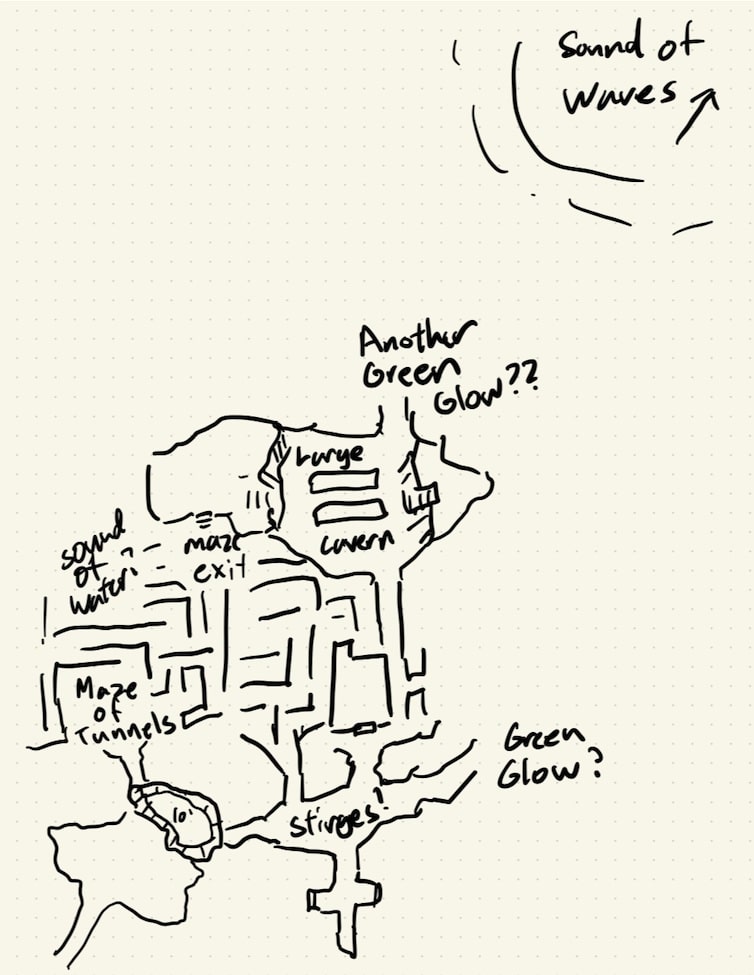
In this example, the party has already encountered the stirges as well as unwisely opened the door to where the ghouls had been lying in wait in the South Barracks (Area 6). They decided not to move towards the green glow of the Fungi Cavern (Area 8) and having spied the ghouls in The Great Cavern (Area 9) with a familiar they decided to try their luck at the maze instead. After going through the winding maze (making a few survival checks along the way), they ended up at the large cavern again, the Ghouls pounced on them and after winning the battle they noticed another green glow (the FLAMESKULL!) to the north in the Smelter Cavern (Area 12).

As you can see, a mini-map can make dungeon navigation much easier for players by giving them a rough idea how all the areas they’ve been to in the dungeon are connected.

Optional: Give Map Making Duties to one of the Players

It should be mentioned that a GM doesn’t necessarily need to draw the minimap. Indeed, one of the party members could have a job drawing the map as they go and the rest of the party could consult that party member if they decide they want to double back and try one of the paths that they had previously ignored.

The Hybrid Approach: Only Print Areas Where Detail Matters

When I ran Wave Echo Cave, I decided that I would only print out a few areas:

  • Area 9: The Great Cavern
  • Area 12: Smelter Cavern
  • Area 18: The Collapsed Cavern

The reason I chose to print these areas rather than other areas was for the following reasons:

  • Combat is likely to happen in these areas.
  • There are complex features that would take longer to draw on a dry erase battlemap like cliffsides and rivers.
  • The original map has evocative details like skeletons and forge bellows.

While most of the rooms in the official Wave Echo Cave Map are pretty bare bones, there are many fan made maps (here’s a great one) that flesh out areas like the Temple of Dumathoin (Area 19) and the Forge of Spells (Area 15). If I was using a fan made map with more added detail. I’d probably print out these areas too.

For battle encounters in rooms that don’t have much detail, like the Ghouls in the South Barracks (Area 6) or the bugbears in the North Barracks (Area 11) it shouldn’t take you longer than a few minutes to draw the room on a battlemat. Most of the rooms are just rectangles, after all.

Wave Echo Cave: General Suggestions

Before going into the room-by-room suggestions for Wave Echo Cave, here are some general suggestions:

  • To add more immersion, play the audio for this Youtube video in the background. This will provide both music and booming sounds at regular intervals.
  • Being aware of the strategies that monsters will use when encountering PCs will be very helpful to make your combat encounters feel more dynamic. I highly recommend reading articles about each of the monsters in Wave Echo Cave on Keith Amman’s site, The Monsters Know What They’re Doing. Just do a site search for the monster you’re looking for and you’ll be good to go.

Wave Echo Cave: Room by Room Suggestions

Many of the rooms in Wave Echo Cave really don’t require much tweaking. However, since many of the rooms are rather generic and don’t give us a real idea of what kind of place Wave Echo Cave happens to be, we should take this opportunity to inject some lore about the cave in these rooms (Thanks to Mathew Perkins’ video on Wave Echo Cave for this great idea!). I’ve provided some ideas for each room to get you started. You can also use my AI Powered Location Description generator tool to come up with some interesting ideas for each room.

Area 1: Cave Entrance

When PCs make it down into the open pit to the northeast of the cave entrance, there’s really no reason for them to go towards area 2 or area 3. Because no details are provided, one choice is as good as the other. To make it feel more like a choice, you can add these details:

Peering around to the north you can see the beginnings of a maze of tunnels, most likely exploratory prospecting tunnels. The tunnel to the east seems to open up to a large natural cave with a much higher ceiling than the tunnel itself.

Area 2: Mine Tunnels

The Mine Tunnels is an area that’s much better to do in theater of the mind than on a battle map. As a GM you can narrate the twists and turns of this maze and ask for a DC 15 Survival check to see if the party gets lost. For every failed Survival check, the party needs to make a random encounter roll.

After the party succeeds on a single survival check, whoever made that successful check will notice two important details: an ammonia like smell (this is the ochre jelly) to the north, and a shuffling sound (these are the ghouls) to the northeast. A high DC18 nature check will tell party members that the smell is likely the leavings of a slime creature.

If the party decides to head towards the ochre jelly, characters with a high enough passive perception will notice that the ceiling is moving. This is the ochre jelly lying in wait for some tasty prey.

Area 3: Old Entrance

  • Among the remains of the Orc bodies are wooden shields crudely painted with the crest of Uruth, a legendary Orc warrior who devastated the Sword Coast centuries ago. If the party visited Wyvern Tor, they will have noticed the crest looks very similar to that of the orcs they encountered there.
  • The emblems of three major families: one Dwarven (Rockseeker), one Gnomish and one Human (Tresendar) appear on the mural to symbolize the Phandelver pact.

Area 4: Old Guardrooms

  • Inside a tattered satchel carried by one of the skeletons is a letter from a relative from Waterdeep. This letter would mention the orc uprisings ravaging the Sword Coast and warn the guard that a small town like Phandalin just isn’t safe, no matter how powerful he believes the high Mage Mormesk might be.
  • A box full of earplugs. How else could these guards get some sleep when the cave was booming all the time??

Area 5: Assayer’s Office

There’s a small shrine to Tymora in a recess in the north wall. This shrine looks like it may have been carved by the same individual who carved the Shrine of Luck in Phandalin. Any PC who leaves a gold coin or more upon the shrine gets the benefit of the bless spell for 1 hour. Any additional contributions will not result in a blessing.

Area 6: South Barracks

  • Mining implements are found here, as this was the barracks where the miners lived.
  • A Dwarven rune has been painted on the entrance to the south barracks to ward off evil. It has almost completely faded and since there were Ghouls in here, we can assume it no longer works.
  • A small shrine to Dumathoin is at the end of the wall. If one is perceptive enough, one can notice the leavings of gemstones ground to dust. This makes sense as Clerics to Dumathoin would grind gemstones as a form of sacrifice.
  • There is one set of Dwarven armor in this room. A dwarf in the party might recognize the armor design to be similar to that of Mirabar. Perhaps some Dwarven families managed to flee Phandalin and went north to Mirabar?
  • There is also a box full of earplugs here, just like in Area 4.

Area 7: Ruined Storeroom

  • Although there is no food left in the storeroom, there are many barrels labeled “Phandalin Cider”
  • A book of recipes can be found on top of the barrel. It appears as though this book was written by several individuals; each of them contributing Dwarven, Gnomish, and Human recipes to the book. One of the recipes for shepherd’s pie seems awfully close to the shepherd’s pie served in taverns along the Sword Coast today.
  • Inside the recipe book is a note about poisonous fungal spores in Wave Echo Cave. Instructions are given to minimize the exposure of food to these spores.

Area 8: Fungi Cavern

There are bodies left over from the battle of Wave Echo Cave here, but they have been subsumed in fungus. A high (DC18) perception check will reveal a skeletal hand reaching out from the fungus. On the skeletal hand is a ring of protection +1. The ring is of gnomish craftsmanship, and upon the inside of the ring are the words “Friend of Garl“. Whoever puts on this ring will also receive flashes of the former owner’s life, as a miner with family living in Phandalin.

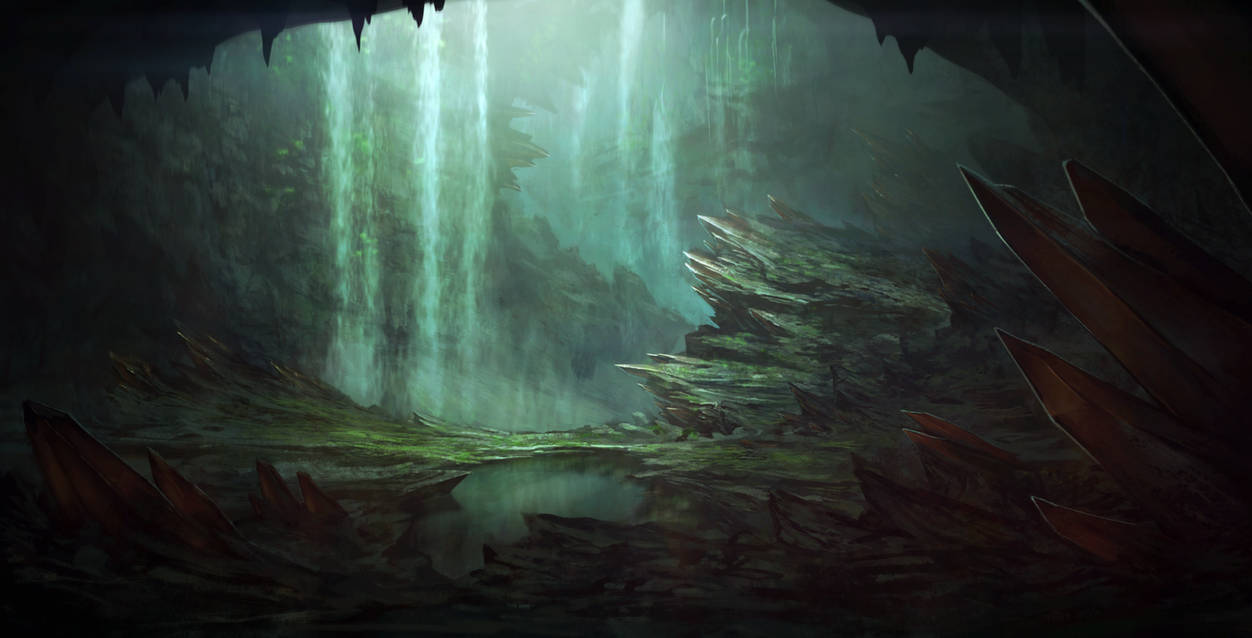
Area 9: Great Cavern

If you have read the article I wrote on the Orcs of Wyvern Tor, and want to include the suggestions I added for the Orcs, Brughor Axe-Biter and his orcs would arrive at Wave Echo Cave slightly before the PCs if the orcs hadn’t been dealt with at Wyvern Tor. They would most likely be in the Great Cavern (Area 9) in search of the hand of Uruth.

Area 10: Dark Pool

In my article on the Forge of Spells, I suggested that the Forge may be connected to the Elemental Plane of Water or the Shadowfell. If this is the case, anyone who dives deeply enough into that pool could find themselves on that plane!

Area 11: North Barracks

  • Since we already have barracks for the Human guards and the Dwarven miners, this is likely where the Gnomish goldsmiths and jewelers lived. Because of this, the beds are far too small for the poor Bugbears to sleep in.
  • In the corner of the room is a small shrine to Garl Glittergold, one of the main gods of the Gnomish pantheon.
  • A careful inspection of the room will reveal the remnants of jewelers tools.

Area 12: Smelter Cavern

  • Dwarven runes are engraved upon each brick that makes up the smelter. These runes ensure that the metal smelted from the ore can better absorb magic when taken to the Forge of Spells.
  • The zombies under the command of the flameskull all have the Tresendar family crest embroidered on their tattered armor.

Area 13: Starry Cavern

  • Anyone who makes a DC12 perception check will notice that tiny runes have been carved all along the cave walls to focus the ambient magic of the Cave on a particular point–this point being the Forge of Spells.
  • Any cleric or paladin who inspects any corpses left behind from the ancient battle will have a flashback to the battle itself. In this flashback they will see Mormesk as he was in life fighting desperately to hold back the orcs.

Area 14: Wizard’s Quarters

As the Lost Mines book describes Mormesk the Wraith as a “powerful mage”, he was likely the wizard who created the Forge of Spells in the first place. While it’s tempting to have Mormesk attack the party as soon as they enter his quarters, Mormesk may play an important role in the future. For example, Mormesk may be the only one who knows how to properly operate the Forge of Spells and he’s only willing to give away that knowledge for a price.

It’s likely that the very process of harnessing the energies of Wave Echo Cave to create the Forge of Spells was a dangerous task, and an accident transformed one of the Wizards of the Pact into the Nothic who happens to now live beneath Tresendar Manor. It’s possible that the Nothic’s hoard contains clues to who Mormesk was and what the relationship between Mormesk and the Nothic might have been.

According to the Monster Manual, Nothics are usually wizards who, having devoted their lives to “unearthing arcane secrets, are reduced to creeping, tormented monsters by a dark curse left behind by Vecna” 1. This fits well into the idea that the power of the Forge of Spells originates from the Shadowfell, as Vecna happens to be a resident there. The connection between the Forge and the Shadowfell is an idea I explore in more depth in my article about the Forge of Spells.

For more ideas on connecting Mormesk to the Nothic, check out this excellent video about the Nothic by Lutes and Dice.

Area 15: The Forge of Spells

If you plan to use a printed or digital map for the Forge of Spells I highly recommend using this fan made map, as it makes the forge seem like the powerful MacGuffin that it’s hyped up to be. As understanding the properties and origins of the Forge are a crucial part to the campaign, I wrote a separate article about it.

Although the module hints at the fact that the monstrous spectator in the Forge is not hostile to the PCs, I think it’s fun to have it be downright friendly and cordial. It will still try to kill any PC that tries to steal magic items or use the forge, but it may also give a warning. It may say something like: “Uh, I wouldn’t try to do that if I were you, because then I would have to kill you. I wouldn’t want to have to do that. You seem nice.”

Area 16: Booming Cavern

As using the Booming Cavern path is a way of getting around the Flameskull, there should be some risk involved in it.

The text says that “The ledge that hugs the south wall is 15 feet above water level. However, when water surges into the cave every 2 minutes, it raises the water level by 10 feet.”2

Why not have the water surge up beyond the ledge to make it more interesting? Allow players to make DC15 Nature checks to realize that the surges are happening at regular 2 minute intervals. As the ledge is slick and narrow, each PC who traverses it must make a DC 10 Dexterity saving throw. Finally, should players get caught up in the surge, they need to make at DC15 Strength (athletics) saving throw in order to stay on the ledge. Finally, if you want to really crank up the tension, there may be a Giant Octopus lying in wait for any PC unfortunate enough to fall into the depths.

Areas 17-18: Old Streambed and Collapsed Cavern

As the PCs progress along the Old Streambed toward the Collapsed Cavern, they should hear the sounds of the bugbears laboring below on the rift floor.

Masquerading as a Drow, Vhalak will be supervising their work and none of them will be watching the PCs should they be approaching from the streambed. Although it’s tempting to use the doppelganger’s ability to read thoughts to spoil the party’s attempt at an ambush, the ability seems to only work if there’s a target the doppelganger is aware of.

Although the Bugbears will attack the PCs without any thought to strategy, Vhalak will be smarter than that. Immediately after the PCs arrive, Vhalak will try make his way to area 11 to summon more bugbear reinforcements. Although these bugbear reinforcements will want to charge into battle Vhalak will direct them to attack the party from above with their Javelins.

If you read my article about Vyerith and Vhalak, the doppelgangers, I suggest that Nezznar doesn’t know Vhalak is a doppelganger, and that Vhalak is really his own free agent. In this case, Vhalak has no sense of loyalty to the Black Spider. Once he sees that the battle is not going their way, Vhalak decides that his time serving the Black Spider is over and does his best to run from the battle, leaving Wave Echo Cave behind, perhaps to torment the PCs some other day.

Area 19: Temple of Dumathoin

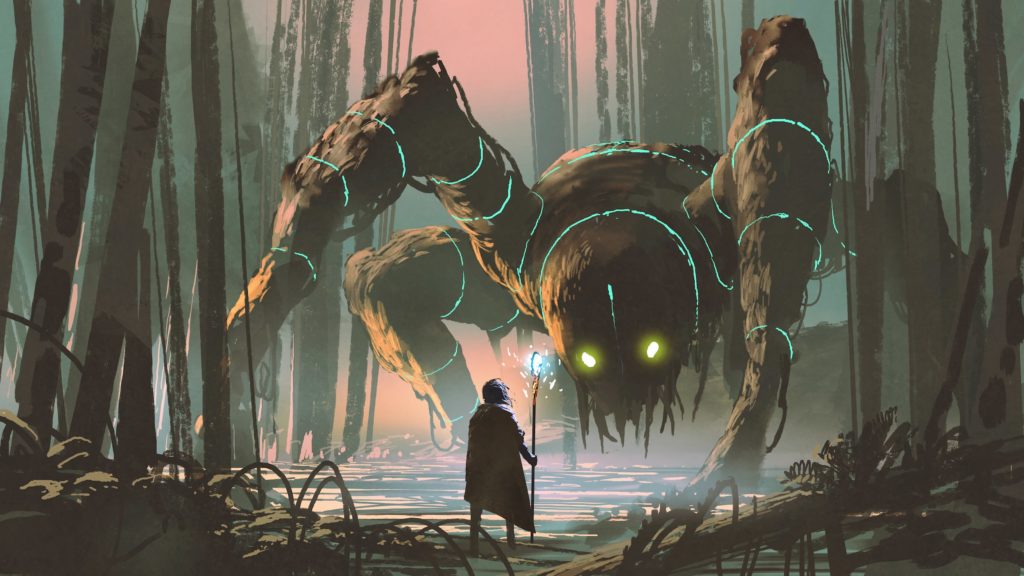
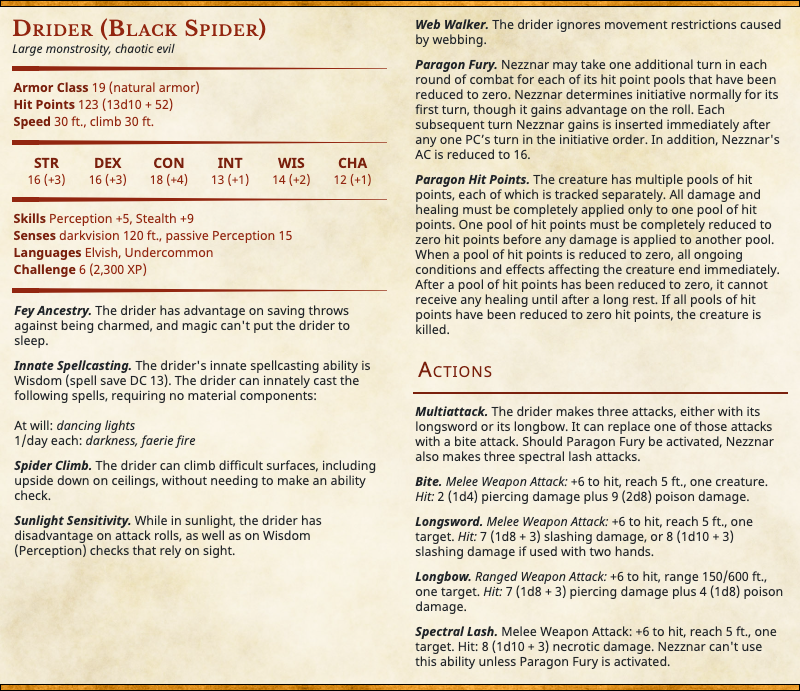
This is it. The final epic showdown that your PCs have been waiting for. Unfortunately, four giant spiders and a Drow wizard is a bit underwhelming for a final encounter. As a GM, you can and should beef up this battle to make it the boss battle it deserves to be. For more on how to do that, skip to the third section of my article on Nezznar the Black Spider.

Roleplaying Nezznar

The Lost Mines module suggests that Nezznar should be curious about the PCs, and even suggest surrendering or cooperating with them in order to catch them off guard.3 Nezznar could give the party a convincing reason for why the Forge of Spells is needed for good: like stopping a group of drow from summoning demons from the abyss (this is explained in more depth in my Nezznar article). We still want a boss battle with Nezznar though, so if the party does cooperate with him, he’d likely turn on them as soon as he gains control of the Forge of Spells.

When Nezznar reaches the Forge, he’ll begin the ritual needed to harvest its power. Have the party make intelligence or arcana checks here so that they know that it’s a good idea for them to interrupt Nezznar before the ritual completes. Otherwise, they’ll likely be facing a much more powerful foe, a drow empowered with the magic of the Forge.

If none of the PCs attack Nezznar before he completes the ritual, Nezznar will turn on them. Consider giving Nezznar additional spells from the Mage stat block double his HP. After Nezznar’s initial defeat, he can transform into a more terrifying monster (more on that here).

While the module’s suggestion for having Nezznar try to pretend to work with the party is interesting. I would personally choose to have Nezznar attack the party right away. At this point the PCs should be ready for a boss battle, and having Nezznar try to trick the party feels like it may drag the story on longer than it needs to.

After the party defeats the Black Spider, make sure to leave some clues behind in Nezznar’s possessions to give the PCs a better idea of who he is (or was) and what he wanted to do with Forge of Spells.

Area 20: Priest’s Quarters

By the time the players reach the room where Nundro has been held prisoner, they will have likely defeated the Black Spider. At this point, the adventure is nearly over. The party can return Nundro to Phandalin and a celebration can be held in their honor!

Wave Echo Cave: A Challenging Dungeon to Run for New GMs

Wave Echo Cave is a challenging dungeon to run for new GMs. The map is huge, and can either take up a ridiculous amount of physical space or be confusing for players going through the dungeon in theater of the mind. Mini-maps can provide a good solution for mitigating any potential confusion that would come from a theater of the mind approach.

Wave Echo Cave is also pretty light on lore, and the onus is on the GM to fill in details about the Phandelver Pact, the Forge of Spells, and Nezznar the Black Spider. Hopefully the this article, and the articles on the Forge and The Black Spider will be helpful for you to fill in the gaps.

What details have you added to your version of Wave Echo Cave? Please share them in the comments!

…

Liked this article? Check out more like it in the Lost Mines of Phandelver DM Guide!

Filed Under: Dungeons And Dragons, Lost Mines of Phandelver Guide Tagged With: black spider, dungeons, forge of spells, maps, nezznar, theater of the mind, wave echo cave

A DM’s Guide to Nezznar the Black Spider

July 13, 2021 by Kenji 8 Comments

What if the final encounter of lost mines looked like this?

As a GM running Lost Mines I struggled with Nezznar the Black Spider more than any other NPC. Nezznar felt out of place, a barely fleshed-out baddie whose appearance at the tail end of the adventure felt tacked on. This made getting PCs to care about whether Nezznar lived or died a difficult challenge. If that wasn’t enough, Nezznar’s stat block made the final encounter far too easy for a level four party and not even close to the boss battle that would make a fitting end to the campaign.

But do not despair, brave GM! With just a few tweaks Nezznar can become the memorable villain that he deserves to be. In this post we’ll discuss some of those tweaks.

First, we’ll work on the Black Spider’s origins by answering an important question: How did a drow from the Underdark become the Black Spider in the first place? Next, we’ll talk about ways for the Black Spider to make an appearance earlier in the adventure so the PCs aren’t asking “who’s this guy?” when they finally meet him at the end. Finally, we’ll beef up the lackluster final battle and transform it into something that Sephiroth would be proud of.

Nezznar the Black Spider’s Origins

When fleshing out the backstory for Nezznar we need to answer a few important questions:

  • Why did Nezznar leave his home in the Underdark?
  • Why is Nezznar seeking the Forge of Spells?

Why Did Nezznar Leave the Underdark?

Although there are many drow Underdark cities, Menzoberranzan is the largest and the one for which we have the most lore. Thus, it makes sense to choose Menzzoberranzan as Nezznar’s original home as we won’t need to make up as many details on our own.

As a resident of Menzoberranzan, Nezznar almost certainly didn’t leave his home willingly. For drow, nothing is more important than exercising power over other drow. This is something that Nezznar would not be able to do if he left the Underdark. Even if a drow felt that they could gain power from some MacGuffin like the Forge of Spells, they almost certainly would not venture out to find it on their own, as doing so would mean to abandon their rank and station, and thus any hope of advancement in drow society.

Most drow live in matriarchal societies due to the influence of their Goddess, the evil spider queen Lolth. As a member of such a matriarchal society, Nezznar would be considered a second class citizen, but certainly not an unprivileged one. As a student of the arcane, Nezznar has a chance (however unlikely) to rise to the highest station available for a male drow: Archmage and Master of Sorcere, Menzoberranzan’s wizard school. Even if Nezznar doesn’t attain such a lofty station, he will still be more respected and feared than many other male drow.

As you can see, Nezznar has a lot going for him, so there’s not a very good reason for him to venture out on his own in pursuit of the Forge of Spells, as leaving the underdark would mean to forfeit his coveted position.

What then would cause Nezznar to leave Menzoberranzan? The most likely possibility is banishment. Some potential reasons for Nezznar’s banishment might be that:

  • Nezznar was framed for a crime
  • Nezznar actually committed a crime
  • Nezznar failed an important mission
  • One of Nezznar’s superiors failed a mission and blamed the failure on him
  • Nezznar’s family lost a war with another family. All members of his family were supposed to be killed but somehow he escaped.

In addition to banishment, Nezznar may receive the curse of driderism. This is a curse by the goddess Lolth by which the afflicted are transformed into hideous spider creatures called driders. It’s possible that Nezznar has found a temporary cure to his driderism and needs the Forge for a more permanent cure.

Why Does Nezznar Want the Forge of Spells?

As I’ve already written an article focusing exclusively on the Forge of Spells, I won’t go too much into detail about the properties of the Forge here. Essentially, all we need to know for the purposes of understanding Nezznar’s motivation is that the forge is powerful and will allow Nezznar to do powerful things. Nezznar may need this power for personal revenge, or perhaps need it to cure a personal affliction like driderism. It’s also possible that Nezznar is working for some greater villain who wants the forge for reasons that don’t become clear until the next campaign.

Nezznar Needs the Forge for Revenge

While the potential targets for Nezznar’s revenge are many, let’s go with the current Archmage of Sorcere, Gromph Baenre.

I like the idea that Gromph saw Nezznar as incompetent and would never give him the time of day. As such, he would continue to pass him over for advancement. Nezznar, feeling that he deserved more, tries to plot against his master and fails miserably.

Having no other choice, Nezznar flees the underdark with his loyal “friend” Vhalak. Nezznar doesn’t know that Vhalak is a doppelgänger and it’s even possible that Vhalak is responsible for Nezznar’s foiled plans against his master. As a doppelgänger, Vhalak wants to seek out others of his kind (he hasn’t found Vyerith yet) and decides that exposing Nezznar and perhaps implicating himself in Nezznar’s crime is a good way to get them both banished.

As Nezznar’s companion, Vhalak continues to assume the identity of a fellow drow wizard. Since Vhalak shows a remarkable talent for magical disguises, he helps to build Nezznar’s network as the Black Spider by infiltrating the Lord Alliance and Cragmaw Tribe and recruiting Vyerith as an apprentice.

For more on Vhalak and Vyerith, check out my article about the doppelgangers.

Once Nezznar establishes himself as the Black Spider, revenge against the Archmage becomes his single and all-consuming goal. Vhalak suggests that they disrupt Gromph’s plans to summon and bind Demogorgon, one of the demon princes of the Abyss (As this is the premise of the Out of the Abyss Module, this would be a good segue into that adventure). Vhalak, being a doppelgänger being capable of reading the surface thoughts of others would likely learn of Gromph’s plans just by being in proximity to him.

Nezznar knows that a source of powerful magic like the Forge of Spells could potentially disrupt whatever ritual Gromph needs to cast in order to summon the great demon. Or, the forge of spells could be the key to crafting or repairing some legendary weapon that Nezznar would need to defeat his former master. Whether Nezznar can do this or not doesn’t matter (he probably can’t). The important thing is that he believes he can.

This makes for a really interesting dynamic because the world would probably be better off if the party lets Nezznar have access to the Forge of Spells. The party doesn’t know this, however, and Nezznar is so arrogant and xenophobic that instead of cooperating with the party he sees them as a nuisance impeding his plans. Should Nezznar survive his encounter with the party it’s quite possible that they will need to enlist his help to fight Gromph or some other greater villain for whom Nezznar bears a grudge.

Some Powerful Entity wants Nezznar to Secure the Forge for Them

Another possibility for the Forge of Spells is not that Nezznar needs it for anything, but someone Nezznar is working for happens to need the Forge of Spells. In my run of Lost Mines, Nezznar has been punished by Lolth for a past crime and has been transformed a drider. As this is considered a mark of great shame in Drow society, Nezznar would stop at nothing to return to his former self, even to the point of making a pact with an archdevil like Zariel.

Nezznar strikes the following bargain: the infernal being grants Nezznar an amulet which suppresses his drider form. In exchange for this amulet Nezznar must agree to conduct an infernal ritual which only a magic source as powerful as the Forge of Spells could fuel. Should Nezznar fail at this task, his soul would be forever enslaved in the nine hells. Should he succeed, Nezznar is permanently cured of his affliction.

What would an archdevil want from the forge? Perhaps Zariel or some other Archdevil wants Tiamat gone from Avernus. In order to do this they plan to use the magic of the forge to weaken the border between Avernus and the material plane, thus making it much easier for Tiamat to escape. This of course, makes for an easy transition into the Tyranny of Dragons campaign.

If you choose to go with the archdevil idea, be sure to leave clues about his affiliation with this infernal being. In my run of Lost Mines, I left the various reagents necessary to perform the ritual for weakening the border to hell as well as a copy of Nezznar’s pact written in infernal among his belongings.

Of course Nezznar’s pact doesn’t necessarily have to be with an Archdevil. Nezznar could form a pact with any great being who may have the power to restore Nezznar back from his cursed drider form. This being could be an archfey, a demon from the abyss, or even one of the great old ones. Choose whatever you feel would be a good match for your campaign.

How Can Nezznar the Black Spider Appear Earlier in the Adventure?

One commonly voiced complaint about the Lost Mines module is that the only time the party has an opportunity to meet Nezznar is at the very end. Because we don’t really know anything about the Black Spider, there is very little emotional investment on the part of the PCs to care whether he lives or dies. One way to solve this problem is to have Nezznar make an appearance before the PCs before they are ready for him. Another way is to drop more lore about the Black Spider as the party progresses in the campaign.

An Early Encounter with Nezznar

One potential spot for an early Nezznar encounter is right after the PCs have cleared the Cragmaw Hideout. I think it works pretty well and will definitely make the party hate Nezznar, but it also might be a little hardcore for new players who may not be ready for such an encounter in their second session of play.

At this point in the story, Nezznar wants to spend more time trying to find the Forge of Spells, but he’s more worried that some third party will find out about the Forge and overwhelm him with sheer numbers. This is why interrogation of the Rockseeker brothers is so important. Wanting to take care of this important matter personally, Nezznar decides to head to Cragmaw Hideout himself to ensure that the Rockseeker problem is taken care of.

After nabbing Gundren at the hideout, Nezznar heads to Cragmaw Castle with Vyerith and some loyal Cragmaw gobilns. Before they get very far, a frantic messenger goblin riding on wolf-back informs Nezznar that a party of adventurers has cleared out Cragmaw Hideout and rescued Sildar.

Cursing this turn of events, Nezznar directs Vyerith and the goblins to take Gundren to Cragmaw Castle while he turns around to deal with the PCs personally.

As the party heads down to Phandalin they will be ambushed by five giant spiders. Nezznar will be a hooded figure with a spider staff who uses misty step and darkness to escape should the party get too close. Nezznar will try to remain unseen behind the trees and will only be noticed by players with a passive perception above 15.

If The party loses against Nezznar and his spiders:

The party is close enough to town that Daran Edermath will notice the commotion and defeat the remaining spiders on his own. Daran will help carry unconscious party members to his orchard to help them recover. Daran mentions that he “might have seen a drow with a spider staff” but doesn’t believe a drow would be so far from home. This would be a good opportunity to do a lore dump on the drow as Daran would likely be knowledgeable about them.

It’s possible that some PCs could die here. If you want to go easy on the party, Daran will attempt to to stabilize dying players or even feed them a healing potion (this might be recommended for newer players).

Dealing with a PC death or even a TPK at this point shouldn’t be too hard though. Should the entire party or all but one party member die, roll up a new party who happen to be charged with investigating the PC deaths. Should only one party member die, the new character can be in Phandalin investigating the Redbrands and the disappearance of the Dendrar Family.

If you’re going to allow a TPK, be sure you mention that this might be a possibility to your players before you begin so you don’t catch them off guard.

If the party wins against Nezznar and his spiders:

This would be the less preferable outcome, as Nezznar will seem like less of a threat to the party. It makes sense that should Nezznar see the tide turning against his spiders, he’d immediately retreat. On the unlikely chance that Nezznar dies or gets captured, you can replace him with another villain of your choice who can assume the role of the Black Spider in Nezznar’s place.

Possible variant to the Encounter

One variation on the this Nezznar encounter would be a similar encounter after the party clears the Redbrand hideout. In this version of the encounter, the party would run into Nezznar as they leave the hideout. Nezznar, deciding that he doesn’t want to engage with adventurers powerful enough to have vanquished the Redbrands on their own, sends spiders to attack the party while he quickly makes his escape.

Nezznar Lore Drops and Clues

If you want to maintain more of a sense of mystery about the Black Spider but still want to insert him into the story more, you can leave more lore and clues behind at various spots in the adventure.

Some possibilities are:

  • Work with one of the players to incorporate Nezznar into their backstory. Perhaps the Black Spider was responsible for the assassination of certain prominent figures in Neverwinter, one of whom the PC was close to. If you do this, be sure to give players an opportunity to discuss backstories (I provide a way to do this in my article about what to do before the Goblin Ambush).
  • A bottle of drow poison is found in Klarg’s stash in Cragmaw Hideout. A high enough medicine check will let you know that drow poison is extremely rare outside the Underdark.
  • In one of the empty cells of of the Rebrand Hideout is a corpse wrapped in spiderweb left by one of Nezznar’s pets.
  • Halia once had a confrontation with the Black Spider. She has a dagger of drow make on her desk as a souvenir of that encounter. When asked about the dagger she will lie and say she bought it off a merchant in Neverwinter.
  • One of the party members has a prophetic vision of the Black Spider doing something villainous, perhaps interrogating Nundro Rockseeker, Gundren’s brother.
  • The Glasstaff that Iarno Albrek wields is a drow artifact.

Making the Final Black Spider Encounter More Challenging and Memorable

One of the ways to make the final Black Spider encounter more challenging is to have Nezznar transform into a Drider as soon as he’s defeated. If you do any amount of googling about how to improve the Nezznar encounter, you’ll find this is a common suggestion.

While I think turning Nezznar into a drider is a good idea, I think we can do more to give our players more of an epic boss battle feeling.

Generally boss battles will follow this progression:

  • The party seems to defeat the villain, and it’s easier than we expect it to be. This would be Nezznar in the form of a drow wizard.
  • A hideous transformation! The boss undergoes some drastic transformation in a desperate effort to stay alive. In this case Nezznar transforms into a drider. There are two ways this can happen: either Nezznar’s existing drider curse has been suppressed by some powerful magic which fails once he becomes unconscious or Lolth decides to curse Nezznar on the spot for being a failure.
  • The final form! At half HP, Nezznar the drider manages to tap into their final reserve of energy, becoming even more hideous and formidable looking (perhaps even looking like the picture at the top of the post). At this stage Nezznar will have access to new abilities and can attack twice as fast.

While stage one and two are essentially two separate encounters that happen right after the other, the third stage of the Black Spider encounter will use some of the ideas about “paragon monsters” provided by Angry GM.

While I’m going to summarize Angry’s ideas as best I can for the purposes of the Black Spider encounter, I highly recommend you read his articles regarding building better boss battles here:

  • Return of the Son of the Boss Fight: Now in 5e
  • Son of the D&D Boss Fight Part 2: Elemental Boogaloo

The idea is that we’re going to split the Nezznar Drider’s HP into two pools of hit points, each pool being 61 hp. You give Nezznar the Drider advantage on the first initiative roll and treat it as a regular combat encounter until Nezznar reaches half HP. This is when Paragon Fury (see stat block below) kicks in.

At half HP, Nezznar’s eyes will start glowing purple/black and is surrounded by an aura of energy the same color. We roll initiative again so that Nezznar now has two complete turns per round. In addition, Nezznar has access to a “spectral lash” power which is essentially a re-flavored version of the two-handed longsword attack. Also, we’re going to lower Nezznar’s AC to 16 as we want Nezznar’s vulnerability to increase as his damage output increases. This works out narratively as Nezznar will be more reckless and much less careful about blocking attacks in stage three.

Here’s the revised drider stat block you can use after Nezznar is defeated in drow form:

This is a relatively simple example of things you can do with a paragon monster. If you want to be fancy, you can have the behavior of the final stage be identical to some other monster. You could, for example, give Stage 3 Nezznar the abilities of a Bearded Devil. The infernal wound left by the devil’s glaive could be reflavored as a a spectral stinger or something else that leaves a lingering wound.

Because the bearded devil is rather weak, you can use the Monster Scaling Tool to make it a higher CR creature and then use a re-flavored version of the scaled-up devil stat block as Nezznar’s third stage.

As you can see, paragon monsters have a lot of versatility and have the potential to transform the final encounter with Nezznar the black spider into something much more memorable than it currently is.

Finally, you can use my Statblock Generator to create two statblocks: Nezznar before transforming and Nezznar after transforming. After Nezznar before transforming dies, you can just switch statblocks.

A Challenging Villain to Improve

Nezznar can be a challenge for GMs to improve because it seems unlikely a male drow would be on their own wreaking havoc so far away from the Underdark. Also, as a villain who makes their first appearance at the end of the adventure, he doesn’t really fit with the campaign. Finally, the mechanics of the final encounter leave much to be desired.

Making Nezznar a memorable villain will take some effort on the part of the GM, but hopefully the ideas provided above about Nezznar’s backstory, ways to weave him into the the narrative more, and tweaks to the final boss battle will be helpful.

What tweaks have you made to Nezznar the Black Spider? Please feel free to share them below in the comments!

…

For more posts like this, check out the Lost Mines of Phandelver GM Guide!

Filed Under: Dungeons And Dragons, Lost Mines of Phandelver Guide Tagged With: black spider, drider, drow, forge of spells, lolth, nezznar, paragon monsters, Phandelver, underdark

A DM’s Guide to the Forge of Spells

June 25, 2021 by Kenji 2 Comments

When we reach the forge of spells in Wave Echo Cave it’s far from the legendary MacGuffin that the players have been led to expect. Instead, we get a “small brazier in which an eerie green flame dances and crackles” 1. Apparently, the power of this brazier/forge has “waned over the years, to the extent that it can no longer be harnessed to permanently enchant magic items”2.

The underwhelming nature of the forge is likely an attempt to “nerf” it so the party doesn’t have access to a potentially never-ending stream of magic weapons. To me, however, this greatly reduces the campaign’s stakes. As the adventure is written, the consequences of Nezznar seizing control of the Forge of Spells is negligible. Of course, the PCs don’t know that the forge has diminished in power until they get there, but when they finally do it’s anticlimactic to say the least.

This post will offer some ideas for fleshing out the Forge of Spells. First, we’ll explore reasons for why Wave Echo Cave has magical power in the first place. Then, we’ll go over some ways the wizards of the Phandelver Pact managed to harness the magic of the Cave and build the forge. Finally, we’ll discuss how we can make the forge more powerful and consequential without breaking the game.

Why Does Wave Echo Cave Have Magical Power?

In order to add depth to the story you want to tell, It would be helpful to come up with some plausible reasons why Wave Echo Cave happens to have magical power. The most common origins of magical power are:

  • Influence by gods or other powerful beings
  • Influence of a bordering plane of existence

Oftentimes these two are intertwined. If, for example, a place was a gateway to a different world or plane of existence, it could mean that some powerful entity came to the material plane from that other place. This is very common in cosmic horror, where horrific and powerful beings like Cthulhu have arrived from some other unfathomable realm.

Influence by Gods or Other Powerful Beings

In both fantasy and mythology, places can gain magical power because of the influence of some powerful being, whether it be a god, demigod, demon, angel, archfey or primordial. Sometimes the magic comes from an aura that the entity itself happens to give off simply because it happens to live there. Other times a place’s magic power may come from a religion or cult who venerates some being by building temples, shrines or conducting many rituals or human sacrifices there. In these cases it doesn’t matter if the being had ever lived in the place. The magic comes from the rituals themselves.

A place could also be the site of some significant historical event that happens to involve powerful beings. One example would be a cataclysmic battle between gods in the long forgotten past. Crater Lake, for example, was thought by the Klamath people to be the result of a great battle between Liao the god of the underworld and Skell the God of Sky. Maybe a similar battle happened in Wave Echo Cave, and the corpse of the dead god still emanates chaotic magic throughout the cave even in death.

While there are many possibilities, I like the idea of Wave Echo cave being the home to a powerful being. The wizards of the Phandelver Pact manage to imprison it with their magic. Ever since, it has lashed out against its bindings and has continued to do for centuries. The forge has managed to siphon the magical power from this imprisoned being, greatly weakening it. There may be a cult out there that still venerates this entity and vows to set it free. Imagine how vengeful this spirit would be when their bonds are finally broken 😨!

Influence of a bordering plane of existence

“Thin” places are locations where the borders between dimensions are, as the name suggests, unusually thin. Because of this, the ambient magical energy in the place is especially strong and chaotic. In addition, this energy tends to evoke environmental effects that are characteristic of whatever plane Wave Echo Cave happens to be on the border of.

For me there are two planes which come to mind that would be a good fit for Wave Echo Cave: the the Shadowfell and the Elemental Plane of Water.

Influence from the Shadowfell

The Shadowfell is a plane of existence devoid of all light and emotion. It’s a place where there is no sun or stars in the sky and where the undead and cosmic horrors shamble about in the darkness. This influence from the Shadowfell would explain the undead who have arisen throughout Wave Echo Cave, not to mention its gloomy atmosphere.

To emphasize the tie between Wave Echo Cave and the Shadowfell you can include monsters that happen to be native to the Shadowfell like the Darkmantle, Meazels or Skulks.

Some Shadowfell monsters like the Bodak, Balhannoth, Cloaker, Nightwalker or most of the Sorrowsworn will be too formidable for a level 4 party to handle without some alterations. It makes sense, however, that since these creatures are not on their home plane they may be weakened. You can use a Monster Scaling Tool to make them a little weaker for your party.

In addition to having denizens from the Shadowfell creeping in, you could add the following environmental effects:

  • Everything appears drained of color
  • Party members feel drained of all positive emotion, leaving only fear, dread, and sadness.
  • Light sources only illuminate to half their normal radius
  • Barely audible whispers of the dead can be heard by those who are more perceptive than others

Influence from the Elemental Plane of Water

The Booming Cavern (Area #16) could potentially be a portal to the Elemental Plane of Water. In most editions of D&D the Elemental Plane of Water is an endless expanse of ocean with no surface and no floor. While there is no sun, the water has its own luminescence, and is generally temperate. Nearly every sea creature (except for those that need to air to survive like dolphins, seals and whales) can also be found in the plane of water. Water elementals are common, as are Aboleth, Marids and Kraken.

Should your version of Wave Echo Cave have a connection to the plane of water, you can add the following environmental effects:

  • All sources of water, including water from water skins glow on their own accord.
  • When party members approach a body of water, the water from their water skins struggle to get out. Should they uncork the water skins, tiny water elementals jump out to join the pool.
  • The Dark Pool (Area #10) is connected to the elemental plane of water, and there is a tunnel that leads to an endless expanse of ocean near the bottom.
  • Everything is damp, even the insides of the PC’s packs. Because of the dampness all fire damage is reduced by 1d4 hp.

Harnessing the Magic of Wave Echo Cave

Although not a perfect analogy, the harnessing of magical power seems to hold a lot in common with harnessing electrical power.

Here are some examples:

  • Coal: The ambient magic has solidified and can be mined much like ore. It has to consumed or “burned” in some way in order to properly harness the magic contained within. Chardalyn stones are a canonical example of such “magic ore”.
  • Uranium: Similar to coal in that it can be mined, but deposits are much rarer and require a process that only the most skilled alchemists and wizards can unlock. The process of unlocking the magic can be very dangerous in unskilled hands and the consumption of the magic creates a toxic “magical waste” as a byproduct that has detrimental effects like luring the undead or perhaps even causing the decay of one’s soul to those in proximity.
  • Hydroelectric: Mages have built a massive dam covered in runes which prevents the influence from a bordering plane from encroaching upon the material plane. In addition to preventing the magic from the Shadowfell or the Elemental Plane of Water from entering the material plane, the mages learned that they could concentrate and divert this powerful magic to power the Forge of Spells.
  • Solar: The ambient magic requires special technology to harness. Mages need to create arrays of crystals which can absorb the ambient magic in the air and then be directed via conduits to the forge of spells for the creation of magical items.
  • Geothermal: There are dangerous pockets of chaotic magic deep within the earth that could be harnessed upon an eruption.
  • Wind: Crystal nodes or magic circles have been set up throughout wave echo cave to absorb especially violent surges of magical energy. These surges could coincide with each boom echoing through the caverns.
  • Hamster Wheel: An enslaved spirit could be compelled to provide energy through forced labor of some sort. Every time the spirit tries using its magic to break its bonds, the magic actually gets absorbed and sent to the forge.

Making the Forge of Spells more Important

It’s rather anticlimactic for the Black Spider to have been scouring the Sword Coast in search of the Forge of Spells only to find that it’s but a pale green flame in a brazier that only temporarily makes weapons magical. While it makes sense mechanically to not have a potentially endless source of magic weapons, especially with just a level 5 party, we shouldn’t nerf the Forge of Spells at the cost of making it less important.

Below are some ideas for making the Forge of Spells as impressive and important as it should be, as well as mentioning some limiting factors so as not to break the game.

Possible properties for the Forge of Spells might be:

The ability to repair legendary magic items

Because of the incredibly concentrated magic energy harnessed by the Forge of Spells it’s one of the few places where one can fix broken magic items. Perhaps Nezznar has one of these in his possession and needs the forge of spells to get this item to work again.

The limiting factor for this ability is built-in. Unless the party has a broken legendary magic item in their possession, the forge is not of any use to them.

It makes magical item manufacture possible, or perhaps even cheaper

While the DMG provides a handy chart on page 129 on the time and money involved in creating magic items, it doesn’t specify the necessary skills or equipment needed to craft such magic items. It could be that the Forge of Spells is precisely what’s needed to unlock item creation. If you let some downtime pass between the end of the Phandelver adventure and the next campaign, PCs could forgo some of the gold rewards from the mines in exchange for some of the new weapons or items the forge could be creating.

You could even make the gp cost for magic items a little cheaper to make the forge feel special, although you probably wouldn’t want to reduce the time taken to craft the magic items.

Although this seems very powerful, this would probably have negligible balance issues since PCs would only be able to create a few uncommon items or a single rare item for the time you give them before the start of their next adventure. This ability would only be overpowered if you allowed your PCs to start up a magic weapons business over the next few years without having any enemy try to wrest control of the coveted forge from them. I don’t think many GMs would let that happen.

The forge can fuel powerful spells and rituals

If the Forge of Spells concentrates the ambient magical power of Wave Echo Cave and if that magic hasn’t been tapped into for centuries, the Forge could now possess monumental magic power capable of fueling magic spells of an epic level.

Although this also seems like a potentially game breaking property, it’s likely that only mages with specific expertise like the Black Spider would be able to tap into this energy. The party wouldn’t know what to do with it.

Consequences of the Forge of Spells Discovery

After your players complete the Lost Mines adventure, the Rockseekers will have a controlling share of the mine. 10 percent of the mine profits are to be shared with the party and the rest would go to the Rockseekers and those who may have invested in the Rockseeker’s venture. A reasonable amount of profit might be 400-600 gp per month and might require some rolls on the part of the players to determine how profitable the mines actually are for them.

However, just because the Rockseeker Brothers have a rightful claim over the forge doesn’t mean that they’ll be able to maintain that claim. There are plenty of powerful forces on the Sword Coast who would stop at nothing for the kind of wealth that the mines and the forge would bring.

Here are some potential developments you can add into your game after the party completes the Lost Mines Campaign:

  • Halia buys up all the debts of Gundren in Neverwinter and then forces him to sell a controlling share of the mines so that he won’t go to debtor’s prison.
  • Dagult Neverember takes control of the mine in the interest of “regional security” so that he can supply the Lord’s Alliance with spellforged weapons.
  • Dragon Cultists or some other baddies decide to attack Phandalin and claim the wealth of the mines for themselves.

The forge of spells would be highly coveted and it may not stay in the hands of the players or their allies for very long…

…

What forge of spells ideas have you used in your campaign? Feel free to share them in the comments!

For more articles like this, check out the Lost Mines of Phandelver Guide!

Filed Under: Dungeons And Dragons, Lost Mines of Phandelver Guide Tagged With: black spider, elemental plane of water, forge of spells, nezznar, Phandelver, shadowfell, wave echo cave

Primary Sidebar

Hello! My name is Kenji Crosland and welcome to my blog. I recently spent nearly a year traveling the Southern US looking for a new home. I also write about how to run pen and paper RPGs. I also make AI Powered Game Master Tools. Say hello!

Currently Free Game Master Tools

  • D&D 5e Monster Statblock Generator
  • Dungeon Generator 2.0
  • D&D 5e Magic Item Generator
  • D&D 5e Encounter Generator
  • Worldbuilding Dashboard and Settings Generator
  • Location Description Generator
  • NPC Generator

  • Game Master Tools For $3 Patrons

    • Bookshelf Generator
    • Lore and Timeline Generator

    Game Master Tools For $5 Patrons

    • Dungeon Generator 2.0 -- Premium Version
    • NPC Generator -- Premium Version
    • D&D 5e Monster Statblock Generator -- Premium Version
    • Worldbuilding Dashboard and Settings Generator -- Premium Version
    • D&D 5e Magic Item Generator -- Premium Version
    • D&D 5e Encounter Generator -- Premium Version
    • GM Dashboard and Town Generator

    Legacy Tools

  • Dungeon Generator 1.0
  • Dungeon Generator 1.0 -- Premium version

Recent Posts

New Feature: Import-Export Functionality for Game Master Apps!

January 21, 2025 By Kenji

Introducing: The New and Improved Dungeon Generator 2.0!

December 10, 2024 By Kenji

Statblock Generator 2.0 Release!

July 11, 2024 By Kenji

Introducing Kenji’s RPG Setting Generator and Worldbuilding Dashboard!

May 19, 2024 By Kenji

Announcement: Adding Daily Usage Limits to Statblocks

April 15, 2024 By Kenji

Copyright © 2025 · Genesis Sample on Genesis Framework · WordPress · Log in