• Skip to primary navigation
  • Skip to main content
  • Skip to primary sidebar

cros.land

just figuring things out

  • Home
  • Kenji’s Dungeon Master Tools
  • Lost Mines of Phandelver Guide
  • Contact Me
  • Archives

Dungeons And Dragons

New Feature: Import-Export Functionality for Game Master Apps!

January 21, 2025 by Kenji Leave a Comment

One feature that people have been asking about for a while now is an import-export function. This allows users to share their data across browsers or back it up in case they decide to clear their cache. Since all the data is currently stored in the browser’s cache, this new functionality ensures your data is saved as a permanent file on your computer.

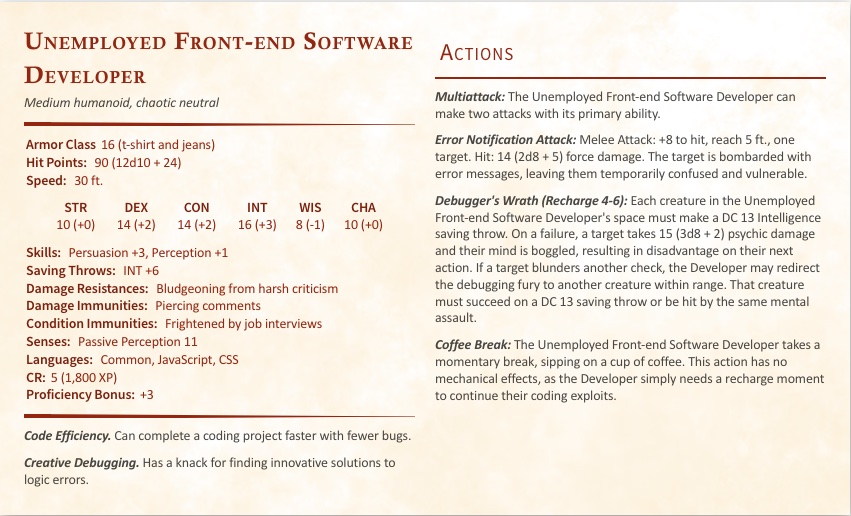
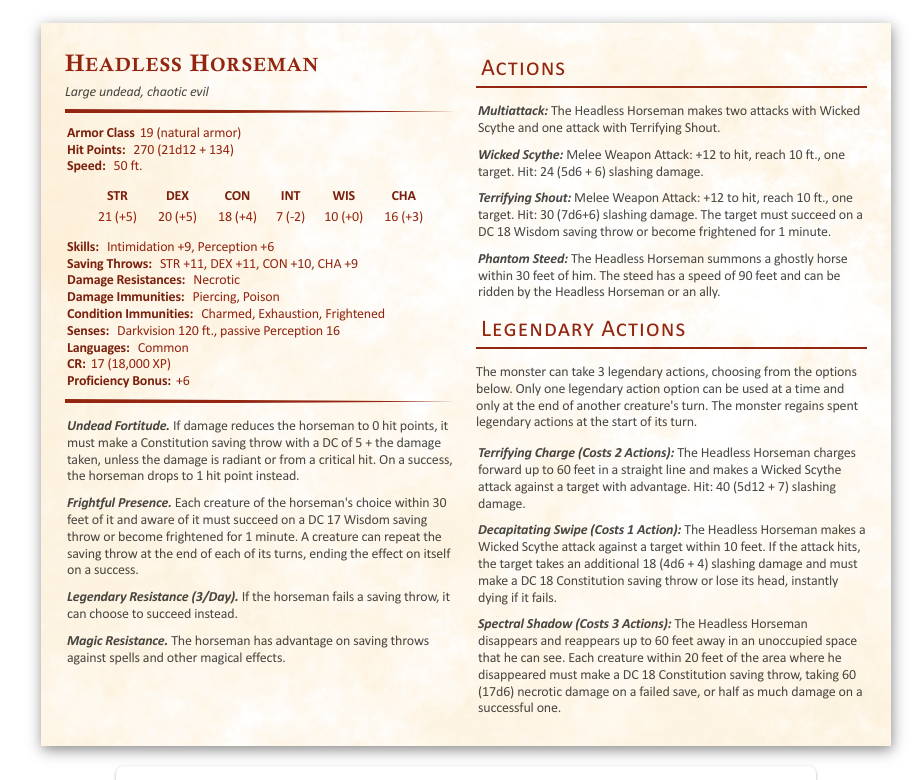
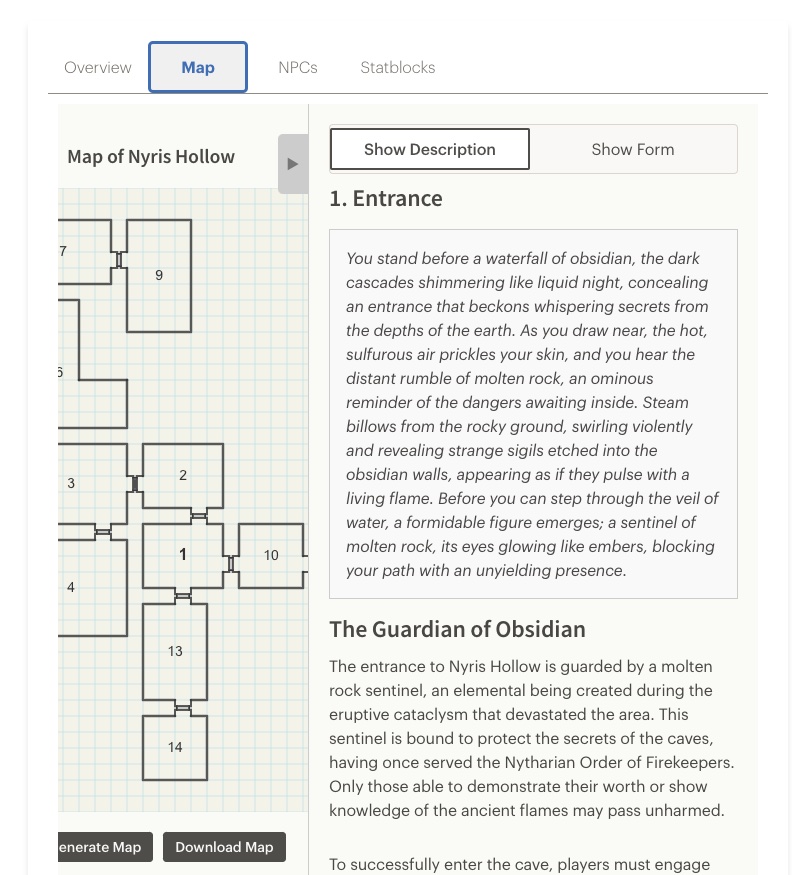
I’m excited to announce that I’ve added save-and-load functionality to the stat block generator, the dungeon generator 2.0, the magic item generator, the world-building dashboard, and the timeline generator—all in their premium versions. So yes, this is a premium feature. Free users can still use the apps just as they have been, but if you want the added benefit of saving your data, you can join my Patreon as a $5 patron. That gives you access to the premium versions of all the apps, along with this new feature.

While this save/load functionality can be used on any of the above apps, you can actually back up the data from all your apps in one place. I have just provided the functionality directly in the apps themselves. So, for example, you can go to the statblock generator and back up all statblocks as well as any magic items or dungeons you may have generated in other apps, and you can choose which of these apps you would like to back up as well.

I know this has been a long-awaited feature, and I’m happy to finally deliver it. If you have any questions, feel free to reach out.

A Quick Word of Caution

While I’m confident this feature works well—I’ve tested it thoroughly myself—I recommend doing a quick sanity check the first time you use it. To be extra safe, don’t immediately upload your saved file into the same browser where you generated it. Instead, download your data from your primary browser (like Chrome) and upload it into another browser (like Firefox) just to confirm everything is working correctly. This ensures that even if something unexpected happens, your data is still safe on another browser.

While the upload feature will overwrite existing app data, I haven’t seen any indication that it would erase everything. Still, better safe than sorry. Once you’ve confirmed it works, you’re good to go!

I hope you find this feature useful and, as always, let me know if you have any questions or feedback.

Filed Under: Dungeons And Dragons

Introducing: The New and Improved Dungeon Generator 2.0!

December 10, 2024 by Kenji 2 Comments

Screenshot of the dungeon generator. Clicking on a room number reveals the room description.

After months of hard work, I’m excited to share the second iteration of my dungeon generator tool. This version is a complete overhaul from the first, designed to meet the needs of Game Masters (GMs) who want to create dungeons quickly—within 10 minutes or less—while still having flexibility and depth.

Let me walk you through the features of this tool and how it works.

Dungeon Overview

The generator starts with a Dungeon Overview, which provides a summary of the dungeon, including its context within your greater setting. The input form for the overview accepts several optional parameters, so you can either customize the dungeon to fit your vision or go fully random. Here’s a breakdown of the key inputs:

  • Adjective: Describes the dungeon’s theme, like “forgotten” or “haunted.”
  • Type of Dungeon: Examples include “outpost” or “crypt.”
  • Place Name: Adds specificity, such as “Farwatch.”
  • Difficulty Tier: Choose from five tiers, ranging from Local Hero to Hero of the Realms, which influence the enemies and obstacles generated.
  • Additional Lore: Add any extra flavor or background details.

Map Generation

Once you’ve created the overview, you can generate a map. The maps are procedurally generated with randomized room sizes and layouts. If the initial map isn’t to your liking, you can regenerate it—but note that doing so will erase any content you’ve added so far.

Room Types and Features

Each dungeon includes several types of rooms to keep gameplay dynamic and engaging. Here are the core room types:

  1. Obstacle Room: Features a barrier that must be overcome to progress. The obstacle could be a locked gate, an illusion, or even a magical spell. The key to solving it doesn’t have to be a literal key—it could be a magical artifact, a piece of knowledge, or something else entirely.
  2. Key Room: Contains the solution to the obstacle room. The challenge here often involves combat, puzzles, or exploration. Key rooms are usually placed away from obstacle rooms to encourage players to explore.
  3. Setback Room: A room where failure results in a disadvantage for the party, such as a temporary debuff or loss of resources. By default, one setback room is included, but you can add more if you want to raise the stakes.
  4. Boss Room: This is where the dungeon’s main challenge resides. The generator suggests a location for the boss room, but you can assign it to any room you prefer if the recommendation doesn’t work for your layout.
  5. Secret and Locked Rooms:
    • Secret Rooms: Accessible only through hidden doors, adding a layer of mystery and reward for perceptive players.
    • Locked Rooms: Require locks to be picked or doors to be bashed down—simpler obstacles compared to full obstacle rooms.

NPC Integration

The tool also allows you to generate Non-Player Characters (NPCs). You can create a description for each NPC and optionally include them in room descriptions to add flavor or role-playing opportunities. NPCs might provide aid, present a challenge, or deepen the story.

Future Features

While I originally wanted to include stat blocks, I decided to focus on creating a minimum viable product for this release. Stat blocks can be added in a future update. For now, you can check out my existing stat block generator, which is linked in the tool itself.

Export Options

Once your dungeon is complete, you can export it in several formats:

  • Markdown for Homebrewery: Perfect for creating polished PDFs.
  • Hierarchical HTML: Great for integrating into digital tools or websites.
  • Plain Text: Simple and universal for quick sharing.

You can also download an image of the map for use in virtual tabletops or printouts.


I hope you enjoy using this tool as much as I enjoyed creating it! I’d love to hear your feedback, see the dungeons you build, and learn about the adventures that unfold because of it. This is just the beginning—I already have ideas for improvements and new features I’m working on.

Thank you for checking it out, and feel free to reach out with any thoughts or questions!

Filed Under: Dungeons And Dragons

Announcement: Adding Daily Usage Limits to Statblocks

April 15, 2024 by Kenji Leave a Comment

In January, I was laid off from my position as a software developer at REI. Since then, I’ve dedicated more time to developing my AI-powered Game Master tools, which started as a passion project. To support this endeavor, I started a Patreon to help cover the costs associated with ChatGPT API calls, without focusing much on monetization initially. However, as I pouring more effort into these tools, I’m shifting towards a freemium model.

This change hasn’t been implemented yet, but I want to share what you can expect. The most popular app, the D&D 5e Statblock Generator, which use templates from D&D 5th edition SRD monsters, will soon have a daily usage limit. Users will be able to generate up to five statblocks per 24-hour period. This limit should accommodate the average user based on my surveys, which show most generate zero to five statblocks weekly.

For those who need more extensive access, a subscription at the $5 or Master Worldshaper level will remove this limit. This adjustment also allows me to potentially make other tools, like the dungeon generator, free for all users while reserving more complex features, like enhanced statblock generation for the npcs that appear in the dungeons, for patrons.

These changes are designed to strike a balance between making the tools accessible and supporting their continued development and my livelihood. If you are excited about these updates or if you’re connected to software development opportunities, please do not hesitate to reach out. My LinkedIn address is here: https://www.linkedin.com/in/kenjicrosland/. I am also eager to hear your feedback and ideas for future enhancements to the Game Master tools.

Thank you for your ongoing support and enthusiasm for the apps.

Filed Under: Dungeons And Dragons, Personal Stories, Technology and Tech Startups

Introducing the AI Powered D&D 5e Encounter Generator!

April 11, 2024 by Kenji 1 Comment

Hey All! I just finished putting together the AI-powered D&D 5e encounter generator. This tool allows you to create monsters or groups of monsters and determine the encounter difficulty based on your party’s composition—simply multiply the number of players by their levels to set difficulty thresholds (easy, medium, hard, or deadly). It also calculates the total adjusted experience based on the number of monsters and their Challenge Rating (CR).

What sets this generator apart is its capability to craft encounters with custom groups of monsters–all you need is a unique name for each monster. Once you’ve assembled your monster group, you can input a brief location description. This can be general, like a “misty forest,” or more specific, such as “the glimmering ruins of Xarnok,” with a bit of background on what Xarnok is—just enough to maintain a good balance without overloading on details.

Additionally, you can designate whether the encounter is an ambush, which will influence how the encounter is described. Upon generating the encounter, you’ll receive a narrative to read aloud and details about the encounter, including non-combat resolutions and possible outcomes.

Clicking “Generate Stat Block” produces custom stat blocks for the monsters in the encounter. Finally, all content can be copied in markdown format, compatible with Homebrewery, allowing you to create beautifully formatted encounters for your personal files or campaigns.

Finally, you can just click “Generate Encounter” without entering anything in any of the fields. This will create a completely random encounter

I hope you enjoy using this encounter generator as much as I enjoyed creating it. For any questions or feedback, please feel free to reach out!

Filed Under: Dungeons And Dragons

Introducing the AI Powered D&D 5e Magic Item Generator!

March 28, 2024 by Kenji 1 Comment

Behold the legendary Goblet of the Firmament!

The Goblet of the Firmament is an exquisite chalice crafted from shimmering silver and adorned with intricate celestial motifs. When filled with liquid, faint constellations appear within its depths, glowing softly as if reflecting the night sky.

Forged in the celestial forges of the Astral Plane by the enigmatic Starweaver, the Goblet of the Firmament was gifted to the Archmage Teladrian as a token of cosmic favor. Its power is said to draw upon the infinite potential of the cosmos, channeling the energies of the stars themselves into mortal hands.

Many in the community have suggested that I develop a D&D 5th edition magic item generator powered by the ChatGPT API. Initially, I was hesitant. Crafting magic items in D&D is as much an art as it is a science, and I aim to create tools that offer more value than a simple ChatGPT query. My stat block generator serves as a prime example of this, where I created generic monster “templates” to across various Challenge Ratings (CR) to ensure the statblocks were mechanically sound and then have ChatGPT imbue each statblock with flavor and descriptions provided by the user.

However, the notion of creating a magic item generator presented a unique challenge. How could I design a generator that not only assigns appropriate rarity levels but also surpasses the experience of manually crafting items with ChatGPT?

It turns out my reservations were unfounded. After spending time experimenting with ChatGPT, particularly version 3.5, and tweaking prompts, I discovered a method to effectively generate D&D 5th edition magic items. By establishing rarity guidelines—such as limiting common item abilities to cantrips or first-level spell equivalents and granting legendary items game-altering powers like those of a 9th-level spell—I was able to introduce structure. This framework not only specifies the rarity but also organizes the output to include the item’s name, type, modifiers, features, physical description, and lore, ensuring a consistent quality in every generated item, a feat ChatGPT alone couldn’t achieve as reliably—at least not at at this writing.

In addition to the consistency provided by this tool, each item generated can be exported in markdown format, compatible with Homebrewery. This means you can instantly integrate a newly created item into Home Brewery, ensuring it is beautifully formatted.

I hope you have fun creating creating new magical items!

Filed Under: Dungeons And Dragons

A DM’s Guide to Wave Echo Cave

July 21, 2021 by Kenji 3 Comments

Crystal Caves
Image Source: “Crystal Caves” by JoshEiten

As a dungeon, Wave Echo Cave poses three challenges to GMs: The immense size of the dungeon’s map, the underwhelming nature of the Forge of Spells, and the lack of challenge that Nezznar the Black Spider presents to a 4th level party.

This post will focus exclusively on the first challenge, as I have already written separate articles about The Forge of Spells and Nezznar the Black Spider. In addition to that, I’ll add some encounters for the journey to Wave Echo Cave as well as suggestions for effectively running some of the areas of the dungeon.

Before Getting to Wave Echo Cave

Since Wave Echo Cave is deep in the Sword Mountains some fifteen miles East of Phandalin, we should probably make it feel like it’s a difficult place to reach. This way, arriving at the Cave feels more like an accomplishment. Here are some potential encounters to use as the party makes their way to the Cave:

Encounter: The Lake God

To set up this encounter, read the following flavor text:

“There are little more than deer and hunter’s trails leading into the foothills of the Sword Mountains, and it’s certainly slow going as you crest the first ridge and descend into a green valley with streams from the surrounding range filling into a silver lake.”

The PCs can choose to avoid the lake if they wish (This is what the Rockseekers had done). If they get closer to it, however, they notice that there’s a rudimentary altar built by kobolds covered in spatters of blood. This is where kobolds would capture mountain goats and leave them as a sacrifice to what they think is the god of the lake, a giant plesiosaurus.

Should the PCs investigate the altar, the plesiosaurus will emerge from the lake, expecting an offering from the party. If the party offers no beast for the dinosaur to consume, it will attack the party and attempt to drag one PC into the water.

This creature might be a bit too easy for a party of level 4 PCs, so consider using this beefed up stat block:

Or, if you want to create your own custom creature, you can use this 5e statblock generator.

Obstacle: The Broken Bridge

As the party emerges from the valley, they start to notice the remnants of a centuries old road, which, although it has deteriorated quite a bit, it’s far better than the deer trails they were following. Also, this should be an encouraging sign that they’re on the right track, as this is likely the road that once connected Phandalin to Wave Echo Cave.

As they crest the next peak, however, they find themselves facing a large ravine. A massive bridge built by talented Dwarven engineers used to span this gap. Almost all of it, however, has fallen to the depths below. All that’s left is a giant chain nearly 2 feet in width.

Gundren will mention this bridge, saying that his brother used a grappling hook gun to secure a lifeline. When the party arrives at the gap, however, the lifeline has been cut, most likely by servants of the Black Spider.

The DC for crossing the chain is normally a DC 10 dexterity check, but occasionally a fierce wind will rush through the ravine. Should that happen, everyone on the chain will need to make a DC 13 strength check.

Falling from the chain and hitting the ground is fatal. However, we don’t want to make a PCs life depend on a single skill check. Should a party member fail their check, they will fall, but they will also be “rescued” by a roper who manages to grapple the falling PC before they plummet to their death. This roper happens to be on a ledge on the other side of the ravine, some 30 feet below the bridge chain.

Give the Party a Long Rest

If you choose to use these encounters, we want to make sure the party enters the Cave fresh. After the party makes it past the broken bridge, it starts to get dark. They can take a long rest and arrive at the Cave first thing in the morning.

Managing the Size of the Dungeon

While you might have been able to purchase images of the previous dungeon maps, download them, and then print them to scale, you’ll find that for Wave Echo Cave it will be most likely be unmanageable. I did a little napkin math for printing Wave Echo Cave to scale and I got dimensions of roughly 9 x 8 feet, which means it would be larger than most dinner tables! For those who have been printing out their dungeons until this point, Wave Echo Cave forces you to consider other solutions.

Using a “mini-map”

One of the simplest ways to run wave echo cave is in theater of the mind. Really all you need to do is read the flavor text for each area and you’re done. When running the dungeon in theater of the mind, however, you do run the risk of having players losing track of where they are in the sprawling network of caverns. This problem can be mitigated by drawing a “mini-map” as the party progresses.

A “mini-map” is exactly what it sounds like: it’s a “miniature map”. This map doesn’t necessarily need to match the Wave Echo Cave map square by square. I’d probably go nuts trying to draw an accurate miniature version of all the twists and turns in the Mine Tunnels (Area 2). Instead, I’d probably go with a more abstract approach like this:

As you can see, the Mine Tunnels aren’t a 1-to-1 copy of the Mine tunnels from the book.

In this example, the party has already encountered the stirges as well as unwisely opened the door to where the ghouls had been lying in wait in the South Barracks (Area 6). They decided not to move towards the green glow of the Fungi Cavern (Area 8) and having spied the ghouls in The Great Cavern (Area 9) with a familiar they decided to try their luck at the maze instead. After going through the winding maze (making a few survival checks along the way), they ended up at the large cavern again, the Ghouls pounced on them and after winning the battle they noticed another green glow (the FLAMESKULL!) to the north in the Smelter Cavern (Area 12).

As you can see, a mini-map can make dungeon navigation much easier for players by giving them a rough idea how all the areas they’ve been to in the dungeon are connected.

Optional: Give Map Making Duties to one of the Players

It should be mentioned that a GM doesn’t necessarily need to draw the minimap. Indeed, one of the party members could have a job drawing the map as they go and the rest of the party could consult that party member if they decide they want to double back and try one of the paths that they had previously ignored.

The Hybrid Approach: Only Print Areas Where Detail Matters

When I ran Wave Echo Cave, I decided that I would only print out a few areas:

  • Area 9: The Great Cavern
  • Area 12: Smelter Cavern
  • Area 18: The Collapsed Cavern

The reason I chose to print these areas rather than other areas was for the following reasons:

  • Combat is likely to happen in these areas.
  • There are complex features that would take longer to draw on a dry erase battlemap like cliffsides and rivers.
  • The original map has evocative details like skeletons and forge bellows.

While most of the rooms in the official Wave Echo Cave Map are pretty bare bones, there are many fan made maps (here’s a great one) that flesh out areas like the Temple of Dumathoin (Area 19) and the Forge of Spells (Area 15). If I was using a fan made map with more added detail. I’d probably print out these areas too.

For battle encounters in rooms that don’t have much detail, like the Ghouls in the South Barracks (Area 6) or the bugbears in the North Barracks (Area 11) it shouldn’t take you longer than a few minutes to draw the room on a battlemat. Most of the rooms are just rectangles, after all.

Wave Echo Cave: General Suggestions

Before going into the room-by-room suggestions for Wave Echo Cave, here are some general suggestions:

  • To add more immersion, play the audio for this Youtube video in the background. This will provide both music and booming sounds at regular intervals.
  • Being aware of the strategies that monsters will use when encountering PCs will be very helpful to make your combat encounters feel more dynamic. I highly recommend reading articles about each of the monsters in Wave Echo Cave on Keith Amman’s site, The Monsters Know What They’re Doing. Just do a site search for the monster you’re looking for and you’ll be good to go.

Wave Echo Cave: Room by Room Suggestions

Many of the rooms in Wave Echo Cave really don’t require much tweaking. However, since many of the rooms are rather generic and don’t give us a real idea of what kind of place Wave Echo Cave happens to be, we should take this opportunity to inject some lore about the cave in these rooms (Thanks to Mathew Perkins’ video on Wave Echo Cave for this great idea!). I’ve provided some ideas for each room to get you started. You can also use my AI Powered Location Description generator tool to come up with some interesting ideas for each room.

Area 1: Cave Entrance

When PCs make it down into the open pit to the northeast of the cave entrance, there’s really no reason for them to go towards area 2 or area 3. Because no details are provided, one choice is as good as the other. To make it feel more like a choice, you can add these details:

Peering around to the north you can see the beginnings of a maze of tunnels, most likely exploratory prospecting tunnels. The tunnel to the east seems to open up to a large natural cave with a much higher ceiling than the tunnel itself.

Area 2: Mine Tunnels

The Mine Tunnels is an area that’s much better to do in theater of the mind than on a battle map. As a GM you can narrate the twists and turns of this maze and ask for a DC 15 Survival check to see if the party gets lost. For every failed Survival check, the party needs to make a random encounter roll.

After the party succeeds on a single survival check, whoever made that successful check will notice two important details: an ammonia like smell (this is the ochre jelly) to the north, and a shuffling sound (these are the ghouls) to the northeast. A high DC18 nature check will tell party members that the smell is likely the leavings of a slime creature.

If the party decides to head towards the ochre jelly, characters with a high enough passive perception will notice that the ceiling is moving. This is the ochre jelly lying in wait for some tasty prey.

Area 3: Old Entrance

  • Among the remains of the Orc bodies are wooden shields crudely painted with the crest of Uruth, a legendary Orc warrior who devastated the Sword Coast centuries ago. If the party visited Wyvern Tor, they will have noticed the crest looks very similar to that of the orcs they encountered there.
  • The emblems of three major families: one Dwarven (Rockseeker), one Gnomish and one Human (Tresendar) appear on the mural to symbolize the Phandelver pact.

Area 4: Old Guardrooms

  • Inside a tattered satchel carried by one of the skeletons is a letter from a relative from Waterdeep. This letter would mention the orc uprisings ravaging the Sword Coast and warn the guard that a small town like Phandalin just isn’t safe, no matter how powerful he believes the high Mage Mormesk might be.
  • A box full of earplugs. How else could these guards get some sleep when the cave was booming all the time??

Area 5: Assayer’s Office

There’s a small shrine to Tymora in a recess in the north wall. This shrine looks like it may have been carved by the same individual who carved the Shrine of Luck in Phandalin. Any PC who leaves a gold coin or more upon the shrine gets the benefit of the bless spell for 1 hour. Any additional contributions will not result in a blessing.

Area 6: South Barracks

  • Mining implements are found here, as this was the barracks where the miners lived.
  • A Dwarven rune has been painted on the entrance to the south barracks to ward off evil. It has almost completely faded and since there were Ghouls in here, we can assume it no longer works.
  • A small shrine to Dumathoin is at the end of the wall. If one is perceptive enough, one can notice the leavings of gemstones ground to dust. This makes sense as Clerics to Dumathoin would grind gemstones as a form of sacrifice.
  • There is one set of Dwarven armor in this room. A dwarf in the party might recognize the armor design to be similar to that of Mirabar. Perhaps some Dwarven families managed to flee Phandalin and went north to Mirabar?
  • There is also a box full of earplugs here, just like in Area 4.

Area 7: Ruined Storeroom

  • Although there is no food left in the storeroom, there are many barrels labeled “Phandalin Cider”
  • A book of recipes can be found on top of the barrel. It appears as though this book was written by several individuals; each of them contributing Dwarven, Gnomish, and Human recipes to the book. One of the recipes for shepherd’s pie seems awfully close to the shepherd’s pie served in taverns along the Sword Coast today.
  • Inside the recipe book is a note about poisonous fungal spores in Wave Echo Cave. Instructions are given to minimize the exposure of food to these spores.

Area 8: Fungi Cavern

There are bodies left over from the battle of Wave Echo Cave here, but they have been subsumed in fungus. A high (DC18) perception check will reveal a skeletal hand reaching out from the fungus. On the skeletal hand is a ring of protection +1. The ring is of gnomish craftsmanship, and upon the inside of the ring are the words “Friend of Garl“. Whoever puts on this ring will also receive flashes of the former owner’s life, as a miner with family living in Phandalin.

Area 9: Great Cavern

If you have read the article I wrote on the Orcs of Wyvern Tor, and want to include the suggestions I added for the Orcs, Brughor Axe-Biter and his orcs would arrive at Wave Echo Cave slightly before the PCs if the orcs hadn’t been dealt with at Wyvern Tor. They would most likely be in the Great Cavern (Area 9) in search of the hand of Uruth.

Area 10: Dark Pool

In my article on the Forge of Spells, I suggested that the Forge may be connected to the Elemental Plane of Water or the Shadowfell. If this is the case, anyone who dives deeply enough into that pool could find themselves on that plane!

Area 11: North Barracks

  • Since we already have barracks for the Human guards and the Dwarven miners, this is likely where the Gnomish goldsmiths and jewelers lived. Because of this, the beds are far too small for the poor Bugbears to sleep in.
  • In the corner of the room is a small shrine to Garl Glittergold, one of the main gods of the Gnomish pantheon.
  • A careful inspection of the room will reveal the remnants of jewelers tools.

Area 12: Smelter Cavern

  • Dwarven runes are engraved upon each brick that makes up the smelter. These runes ensure that the metal smelted from the ore can better absorb magic when taken to the Forge of Spells.
  • The zombies under the command of the flameskull all have the Tresendar family crest embroidered on their tattered armor.

Area 13: Starry Cavern

  • Anyone who makes a DC12 perception check will notice that tiny runes have been carved all along the cave walls to focus the ambient magic of the Cave on a particular point–this point being the Forge of Spells.
  • Any cleric or paladin who inspects any corpses left behind from the ancient battle will have a flashback to the battle itself. In this flashback they will see Mormesk as he was in life fighting desperately to hold back the orcs.

Area 14: Wizard’s Quarters

As the Lost Mines book describes Mormesk the Wraith as a “powerful mage”, he was likely the wizard who created the Forge of Spells in the first place. While it’s tempting to have Mormesk attack the party as soon as they enter his quarters, Mormesk may play an important role in the future. For example, Mormesk may be the only one who knows how to properly operate the Forge of Spells and he’s only willing to give away that knowledge for a price.

It’s likely that the very process of harnessing the energies of Wave Echo Cave to create the Forge of Spells was a dangerous task, and an accident transformed one of the Wizards of the Pact into the Nothic who happens to now live beneath Tresendar Manor. It’s possible that the Nothic’s hoard contains clues to who Mormesk was and what the relationship between Mormesk and the Nothic might have been.

According to the Monster Manual, Nothics are usually wizards who, having devoted their lives to “unearthing arcane secrets, are reduced to creeping, tormented monsters by a dark curse left behind by Vecna” 1. This fits well into the idea that the power of the Forge of Spells originates from the Shadowfell, as Vecna happens to be a resident there. The connection between the Forge and the Shadowfell is an idea I explore in more depth in my article about the Forge of Spells.

For more ideas on connecting Mormesk to the Nothic, check out this excellent video about the Nothic by Lutes and Dice.

Area 15: The Forge of Spells

If you plan to use a printed or digital map for the Forge of Spells I highly recommend using this fan made map, as it makes the forge seem like the powerful MacGuffin that it’s hyped up to be. As understanding the properties and origins of the Forge are a crucial part to the campaign, I wrote a separate article about it.

Although the module hints at the fact that the monstrous spectator in the Forge is not hostile to the PCs, I think it’s fun to have it be downright friendly and cordial. It will still try to kill any PC that tries to steal magic items or use the forge, but it may also give a warning. It may say something like: “Uh, I wouldn’t try to do that if I were you, because then I would have to kill you. I wouldn’t want to have to do that. You seem nice.”

Area 16: Booming Cavern

As using the Booming Cavern path is a way of getting around the Flameskull, there should be some risk involved in it.

The text says that “The ledge that hugs the south wall is 15 feet above water level. However, when water surges into the cave every 2 minutes, it raises the water level by 10 feet.”2

Why not have the water surge up beyond the ledge to make it more interesting? Allow players to make DC15 Nature checks to realize that the surges are happening at regular 2 minute intervals. As the ledge is slick and narrow, each PC who traverses it must make a DC 10 Dexterity saving throw. Finally, should players get caught up in the surge, they need to make at DC15 Strength (athletics) saving throw in order to stay on the ledge. Finally, if you want to really crank up the tension, there may be a Giant Octopus lying in wait for any PC unfortunate enough to fall into the depths.

Areas 17-18: Old Streambed and Collapsed Cavern

As the PCs progress along the Old Streambed toward the Collapsed Cavern, they should hear the sounds of the bugbears laboring below on the rift floor.

Masquerading as a Drow, Vhalak will be supervising their work and none of them will be watching the PCs should they be approaching from the streambed. Although it’s tempting to use the doppelganger’s ability to read thoughts to spoil the party’s attempt at an ambush, the ability seems to only work if there’s a target the doppelganger is aware of.

Although the Bugbears will attack the PCs without any thought to strategy, Vhalak will be smarter than that. Immediately after the PCs arrive, Vhalak will try make his way to area 11 to summon more bugbear reinforcements. Although these bugbear reinforcements will want to charge into battle Vhalak will direct them to attack the party from above with their Javelins.

If you read my article about Vyerith and Vhalak, the doppelgangers, I suggest that Nezznar doesn’t know Vhalak is a doppelganger, and that Vhalak is really his own free agent. In this case, Vhalak has no sense of loyalty to the Black Spider. Once he sees that the battle is not going their way, Vhalak decides that his time serving the Black Spider is over and does his best to run from the battle, leaving Wave Echo Cave behind, perhaps to torment the PCs some other day.

Area 19: Temple of Dumathoin

This is it. The final epic showdown that your PCs have been waiting for. Unfortunately, four giant spiders and a Drow wizard is a bit underwhelming for a final encounter. As a GM, you can and should beef up this battle to make it the boss battle it deserves to be. For more on how to do that, skip to the third section of my article on Nezznar the Black Spider.

Roleplaying Nezznar

The Lost Mines module suggests that Nezznar should be curious about the PCs, and even suggest surrendering or cooperating with them in order to catch them off guard.3 Nezznar could give the party a convincing reason for why the Forge of Spells is needed for good: like stopping a group of drow from summoning demons from the abyss (this is explained in more depth in my Nezznar article). We still want a boss battle with Nezznar though, so if the party does cooperate with him, he’d likely turn on them as soon as he gains control of the Forge of Spells.

When Nezznar reaches the Forge, he’ll begin the ritual needed to harvest its power. Have the party make intelligence or arcana checks here so that they know that it’s a good idea for them to interrupt Nezznar before the ritual completes. Otherwise, they’ll likely be facing a much more powerful foe, a drow empowered with the magic of the Forge.

If none of the PCs attack Nezznar before he completes the ritual, Nezznar will turn on them. Consider giving Nezznar additional spells from the Mage stat block double his HP. After Nezznar’s initial defeat, he can transform into a more terrifying monster (more on that here).

While the module’s suggestion for having Nezznar try to pretend to work with the party is interesting. I would personally choose to have Nezznar attack the party right away. At this point the PCs should be ready for a boss battle, and having Nezznar try to trick the party feels like it may drag the story on longer than it needs to.

After the party defeats the Black Spider, make sure to leave some clues behind in Nezznar’s possessions to give the PCs a better idea of who he is (or was) and what he wanted to do with Forge of Spells.

Area 20: Priest’s Quarters

By the time the players reach the room where Nundro has been held prisoner, they will have likely defeated the Black Spider. At this point, the adventure is nearly over. The party can return Nundro to Phandalin and a celebration can be held in their honor!

Wave Echo Cave: A Challenging Dungeon to Run for New GMs

Wave Echo Cave is a challenging dungeon to run for new GMs. The map is huge, and can either take up a ridiculous amount of physical space or be confusing for players going through the dungeon in theater of the mind. Mini-maps can provide a good solution for mitigating any potential confusion that would come from a theater of the mind approach.

Wave Echo Cave is also pretty light on lore, and the onus is on the GM to fill in details about the Phandelver Pact, the Forge of Spells, and Nezznar the Black Spider. Hopefully the this article, and the articles on the Forge and The Black Spider will be helpful for you to fill in the gaps.

What details have you added to your version of Wave Echo Cave? Please share them in the comments!

…

Liked this article? Check out more like it in the Lost Mines of Phandelver DM Guide!

Filed Under: Dungeons And Dragons, Lost Mines of Phandelver Guide Tagged With: black spider, dungeons, forge of spells, maps, nezznar, theater of the mind, wave echo cave

  • Go to page 1
  • Go to page 2
  • Go to page 3
  • Go to page 4
  • Go to Next Page »

Primary Sidebar

Hello! My name is Kenji Crosland and welcome to my blog. I recently spent nearly a year traveling the Southern US looking for a new home. I also write about how to run pen and paper RPGs. I also make game master tools. Say hello!

Currently Free Game Master Tools

  • D&D 5e Monster Statblock Generator
  • Dungeon Generator 2.0
  • D&D 5e Magic Item Generator
  • D&D 5e Encounter Generator
  • Worldbuilding Dashboard and Settings Generator
  • Location Description Generator
  • NPC Generator

  • Game Master Tools For Patrons

    • Bookshelf Generator
    • Lore and Timeline Generator
    • Dungeon Generator 2.0 -- Premium Version
    • NPC Generator -- Premium Version
    • D&D 5e Monster Statblock Generator -- Premium Version
    • Worldbuilding Dashboard and Settings Generator -- Premium Version
    • D&D 5e Magic Item Generator -- Premium Version
    • D&D 5e Encounter Generator -- Premium Version
    • GM Dashboard and Town Generator

Recent Posts

Back In the Game!

October 11, 2025 By Kenji

New Feature: Import-Export Functionality for Game Master Apps!

January 21, 2025 By Kenji

Introducing: The New and Improved Dungeon Generator 2.0!

December 10, 2024 By Kenji

Statblock Generator 2.0 Release!

July 11, 2024 By Kenji

Introducing Kenji’s RPG Setting Generator and Worldbuilding Dashboard!

May 19, 2024 By Kenji

Copyright © 2026 · Genesis Sample on Genesis Framework · WordPress · Log in