• Skip to primary navigation
  • Skip to main content
  • Skip to primary sidebar

cros.land

just figuring things out

  • Home
  • AI Powered Game Master Tools
  • Lost Mines of Phandelver Guide
  • Travels With Serpy
  • Contact Me
  • Archives

Combat

“Tokens and Tables and Stats–Oh My!” Managing Combat in D&D

May 1, 2021 by Kenji Leave a Comment

While most of us are playing D&D online at the moment and are depending on apps like Roll20 to keep track of monster tokens, initiative, conditions, hit points, and the other myriad combat details, I know that many of us are anxious to emerge from our hobbit holes to play in-person games again. To help aid the transition back to the dinner table, I’ve put together a guide that will hopefully help streamline your combat experience for in-person games. I hope you find it useful!

Keeping Track of Initiative in D&D

One of the most important things I’ve learned about initiative is that combat goes much faster when people know when their turn is. It is thus extremely helpful to have a visual aid so that people know when the monsters go and a PC gets to go.

Track Initiative with 3×5 Cards

One cheap and easy way to track initiative is with 3×5 index cards. On each card you write the name of a character and put them in order of initiative from top to bottom. Then, you can track the turn order by placing a coin or some other marker next to the active player. Another way to run initiative using cards is to hand out cards with numbers and give them to each player.

Track Initiative Using a Dowel and Flags

My preferred way to track initiative is with this dowel with erasable flags . Here it is below in one of my games:

This image has an empty alt attribute; its file name is IMG_7970BDB63D14-1-576x1024.jpeg

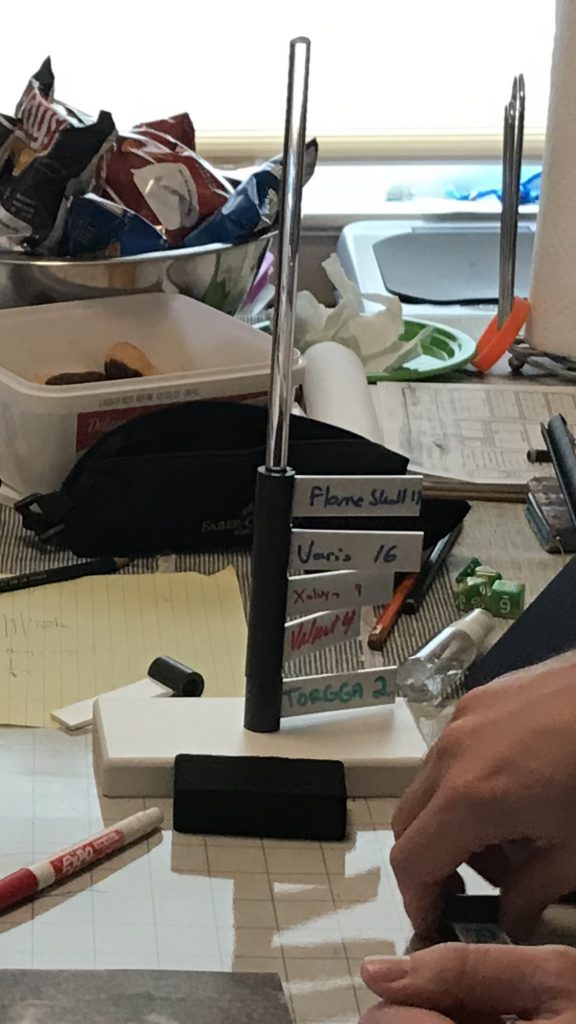
In this example, monsters and players are arranged from top to bottom in the initiative order. Once a player or monster has taken their turn, the flag gets turned to from the right to the left (or vice versa, depending on your preference). Since none of the flags have been flipped to the left, we can tell that we are at the top of the initiative order and the Flameskull gets to go first!

*laughs in fireball*

Also, for those who would rather not spend as much money, you can pretty much do the same thing with clothespins on a wooden dowel.

Tracking Initiative with Tents on the DM Screen

Another way to track initiative is to fold slips of paper in the form of a “tent” and to hang them over your DM screen. Write the names of each character and their initiative number and place them from left to right on the screen so that the initiative order is visible for all the players. To me, this is very similar to how the dowel and flags method works, and it could be a good solution for you.

To learn more about this method, check out this article from DM Dave about initiative tracking.

Keeping Track of Which Enemy is Which in D&D

Another problem that often surfaces in combat is determining which enemy is which. This will be an issue whether you’re using minis or tokens or salt shakers to keep track of it all. You need to have some way of differentiating one token from the next. In my experience, assigning numbers to tokens or minis is the best way of doing this.

Creating Your Own Numbered Tokens

Creating numbered tokens can be as simple as putting a piece of tape on your minis/tokens/saltshakers and using a sharpie to mark them with numbers. For those who want something more fancy, you can follow this process:

  • Find the image of the creature/NPC you want using Google Image Search.
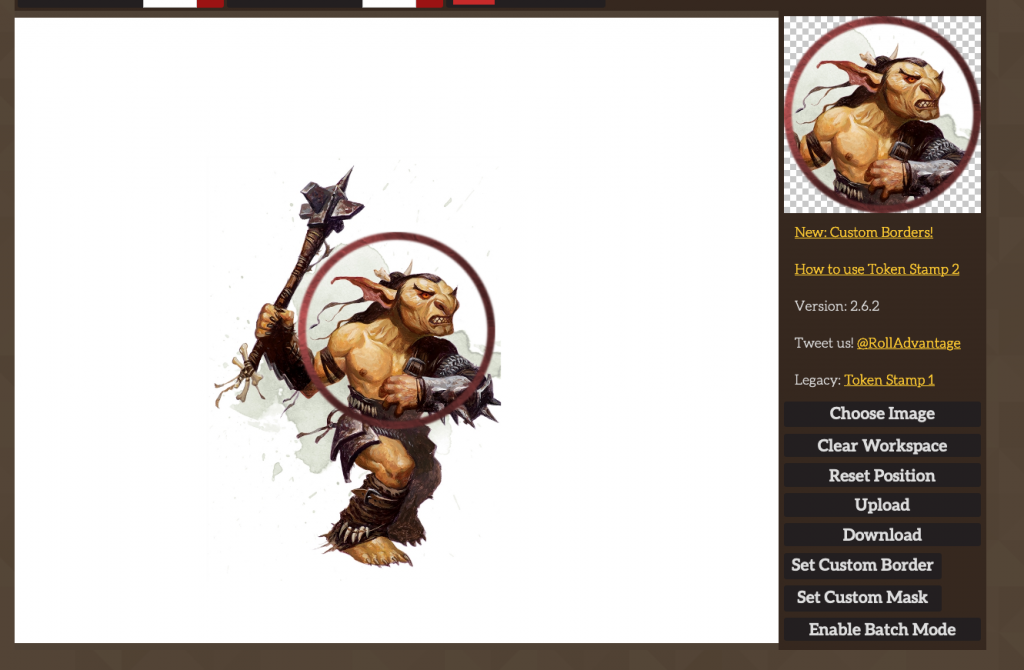
  • Upload the image to the Token Stamp Creator. You can do this either by clicking “Choose Image” or dragging and dropping the image into the center of the screen. Adjust the image size, choose the token border style, and once you’re satisfied, click “Upload Image” to upload the token image to imgur.
This image has an empty alt attribute; its file name is image-1-1024x670.png
  • Go to imgur and copy the image URL (you’ll need to right-click on it and click “View Image” in chrome). This should navigate your browser to the url of the image itself with an “i” subdomain in front of imgur.com and a file format at the end of the url. It should look a lot like this: https://i.imgur.com/5nIXIbn.png
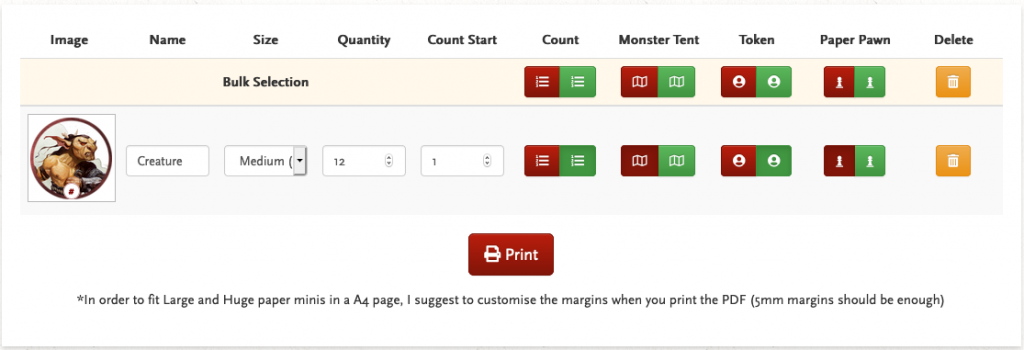
  • Go to https://paper-tokens.firebaseapp.com/ and paste the image url like so:
This image has an empty alt attribute; its file name is image-2.png
  • Once you have chosen the number of tokens, the starting count, size of the tokens and whether you want circular tokens or foldable paper pawns, click print! I’ve taken the liberty of creating a PDF of 12 goblin tokens that you can print right now. You’ll notice that the tokens are already numbered for you.
This image has an empty alt attribute; its file name is image-3-1024x350.png
  • Cutting out the circular tokens can be difficult with scissors, so consider investing in a 1-inch hole punch if you’re going to be doing this a lot. There are larger sized hole punches for larger creatures as well.
  • The paper tokens can be flimsy in and of themselves, so as a final finishing touch you may want to seal the tokens with epoxy stickers. Again, as with the hole punch, there are larger stickers for larger creatures.
  • Finally, you’ll need a place to organize all of these fancy tokens you have created. I myself have ordered several Plano Storage Boxes to store all the tokens I have printed and sealed with epoxy.

Keeping Track of Conditions in D&D

If you’re also using tokens you may want to somehow differentiate one token that happens to be entangled vs another that happens to be on fire. At my own table, I’ve done this with condition rings.

Viridian Condition Rings  70 Status Effect Markers for image 0
Condition Rings from Viridian

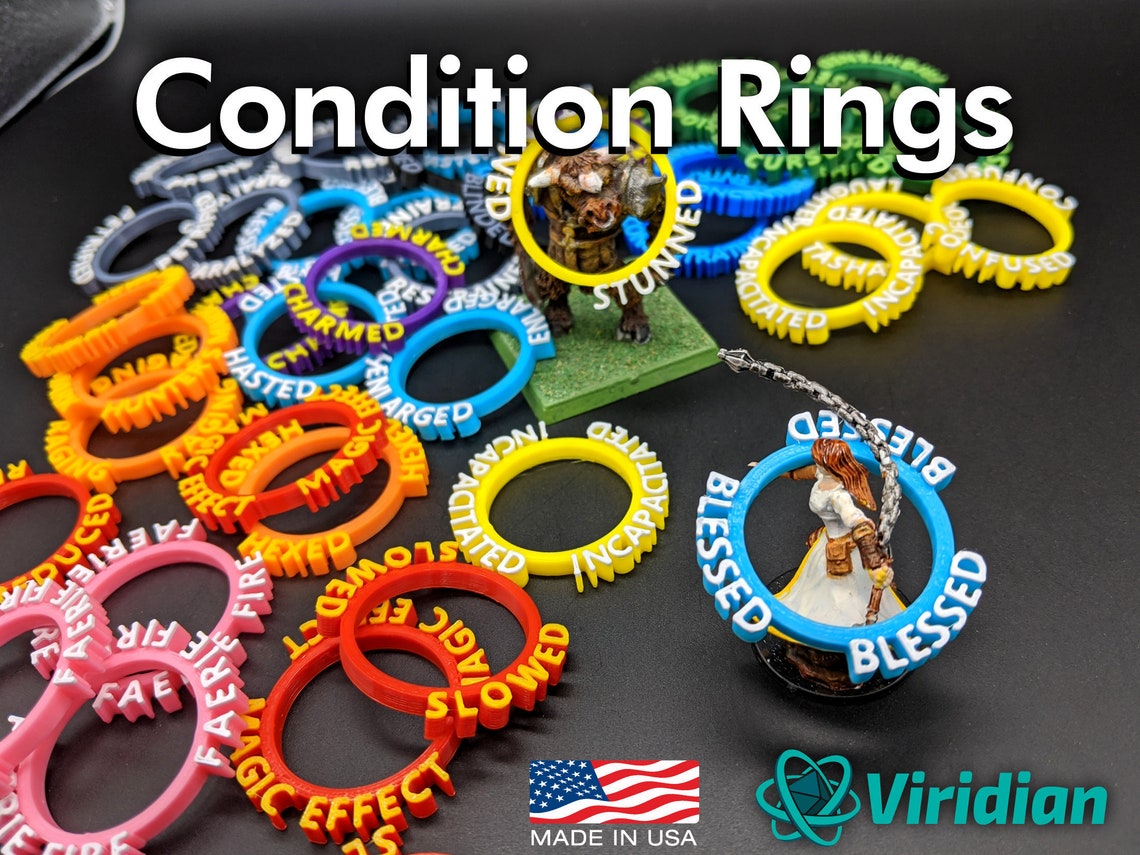
I like these rings very much, but I should point out that sometimes I forget to add and take away these rings when necessary. Generally, I make it a player’s job (usually a player who is more detail oriented than me) to add and remove status rings while I can concentrate on describing combat and adjudicating rolls.

That said, forgetting about conditions is not really a big deal. When we forget about conditions, it means is that we as players have been so engrossed in the game that we forget details. Also, when you as a GM forget conditions it generally works in the party’s favor rather than the other way around because players will often remember details that are advantageous to them rather than details that are detrimental. As a result, your encounter might have been slightly easier, but it probably wouldn’t have made that much of a difference in terms of how fun the encounter was.

Keeping Track of Monster Stats and Abilities in D&D

When keeping track of monster stats and abilities, you should only have the most important details front and center. Keep your monster stat blocks nearby if you need to reference them but only write down monster abilities that you will want to remember each turn. This is how I’d keep track of combat using pen and paper:

Your Combat Tracking Sheet

In this combat tracking sheet example Roderick the bard cast fairy fire which affected three monsters but then he lost concentration. One goblin and one wolf are dead, while another goblin is seriously wounded.

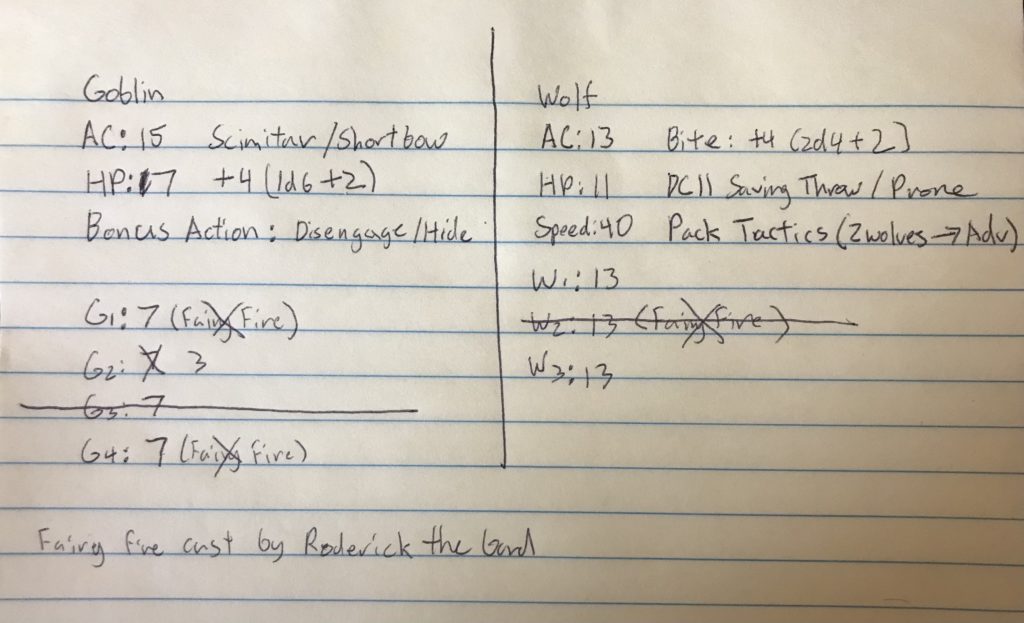
When we put together our tracking sheet these are the details that I find the most important:

  • Armor Class
  • Hit Points
  • Attack Bonus
  • Damage Dice and Modifiers
  • Move Speed (If different than 30)
  • Shorthand for any special abilities the monster might have
  • Saving throws for my PC’s favorite spells
  • Damage resistances for my PC’s favorite damage types (not all of them). In the case of a monster having many resistances, just write “many resistances” so that you will remember to check the stat block when a player throws some fire or lightning or poison at your monster.

It’s important to only list the details that you will need to keep in the front of your mind every turn. Otherwise, you’re just copying stat blocks. I probably don’t, for example, need to remember that goblins have an intelligence bonus of +0. However, let’s say the Archibald the wizard casts an illusion spell–something I didn’t expect him to do. I know that my goblins need to make an intelligence saving throw but I don’t know what the goblin intelligence modifier is. This is when I would consult the stat block.

I prefer to have a monster’s stat block somewhere where I can access it quickly but not front and center where it can be distracting. You could have, for example, a bookmarked page in the monster manual, a photocopy of that page, a monster card, or perhaps a copy and pasted image of a stat block in your notes app of choice.

When in Doubt, Guess!

I made a few mistakes when writing up the combat sheet listed up above. For one thing, I have the wolf HP listed as 13 and not 11, but I probably would have noticed that issue as I was running the combat and corrected it on the fly. The bigger mistake I made, however, was not listing the Goblin stealth bonus. I want to run an encounter where my sneaky little gobbos are shooting at players behind rocks and trees, which means I’ll need to make stealth rolls every turn. I could either look up the goblin stealth stat in the monster manual and modify my sheet, or I could make an educated guess. Chances are my guess will get pretty close to the mark. And even if I am way off, my players will likely not notice.

Let’s play Guess the Stat!

Example: The Wizard Archibald casts an Illusion spell. My Goblin needs to make an intelligence saving throw.

My thought process: I need to make an intelligence saving throw, huh? Well, goblins aren’t super smart but they do have a cunning about them. Their intelligence is probably in the range of 8-12. When in doubt, take the middle. So an intelligence of 10 with a +0 modifier it is.

Even if I guessed the intelligence of the goblin wrong, my guess would probably only off by +1/-1.

Now it’s your turn. try guessing a random stat yourself. What, for example, is the Armor Class of an owlbear?

Answer: https://www.dndbeyond.com/monsters/owlbear

Did you get close? Although you may be surprised by the stats of some creatures. You’ll likely get close to the mark more often than not. If you’re in the heat of combat and you don’t want to slow things down by shuffling through your notes, don’t be afraid to guess the stat and make a ruling on the fly.

Using Apps to Keep Track of Combat Details in D&D

Game Master apps are a promising way to keep track of all combat details: initiative, conditions, monster and PC stat blocks–the whole lot. When running games online on Roll20, I use Roll20’s built in features to keep track of pretty much everything except for my campaign notes. Combining digital GM apps with an off-line experience, however, is a bit more tricky as the transition from digital to analog can get clunky.

While apps like Improved Initiative, Game Master 5, and Fight Club Fifth Edition look slick and have many fancy features, I find that they don’t quite fit my needs as a GM playing an analog game. I don’t, however, want to dissuade you from using apps if you think they can make your life easier. Some of the features that most apps have in common are:

  • A compendium of all monsters included in the SRD — this is most of the monsters in the Monster Manual with the exception of trademark D&D monsters like Beholders and Mind Flayers.
  • Ability to input character sheets of your PCs
  • A handy spell reference (again, these are only SRD spells).
  • Ways to tag monsters and PCs with various conditions
  • Auto calculation of stats
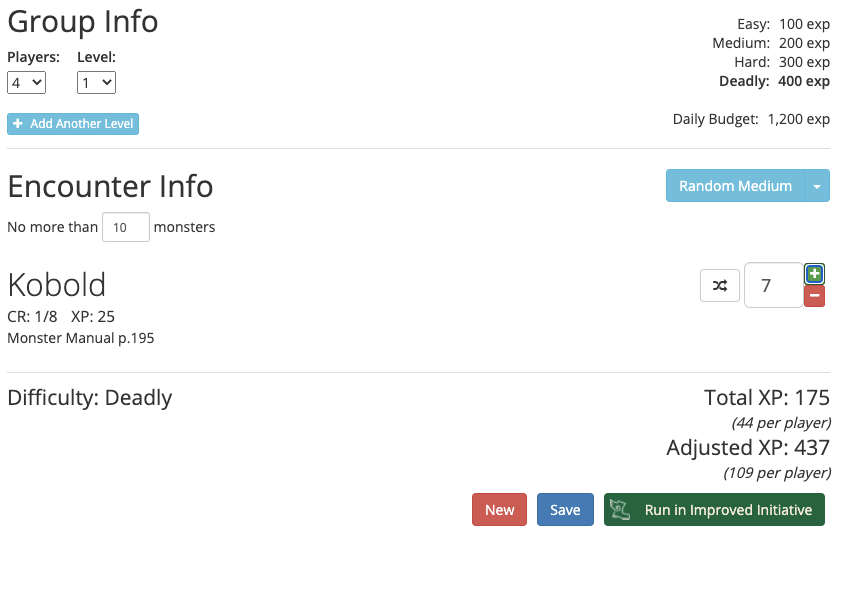
  • The ability to prepare encounters and save them on the app
  • The ability to create new monsters and save them on the app
  • Automatic dice rollers to calculate damage

If any of these features sound promising to you, I encourage you to go ahead and see if running a game with them works for you.

Don’t worry about mistakes!

As a newbie DM, it can be easy to get overwhelmed by all the details. Hopefully the methods provided above will make it easier for you to get those details out of your head and spend less time shuffling through your notes. That said, no system is perfect and it’ll probably take some time and reading other articles like this until you’ve created a system that you’re satisfied with.

In the meantime, remember that it’s better to make a guess about what a rule or monster stat might be than to slow the pace of combat. Nine times out of ten, your players won’t realize you’ve been guessing at all. And the other one time, they’ll likely forgive you 😉

Filed Under: Dungeons And Dragons Tagged With: Combat, combat tracking, conditions, initative, stat blocks, tokens

Your First Phandelver Session, Part 2: Running The Goblin Ambush

November 25, 2020 by Kenji 2 Comments

Seems like a peaceful spot… (Image Source: JamesRPGArt)

This is part 2 of a 3 part series covering Act 1 of Lost Mines of Phandelver. Consider checking out Part 1: Before the Goblin Ambush for more info about setting the scene and generating bonds for the player characters in your party. Please stay tuned for Part 3 on Cragmaw Hideout!

Since the goblin ambush is often the first combat encounter many GMs ever run, it’s important to have a good handle on the rules as they pertain to this particular encounter. Since this is an ambush, concepts such as active vs. passive perception, stealth, and surprise will come into play. Also, since goblins will be behind trees on an embankment, concepts such as cover and difficult terrain are sure to come into play as well. In addition to reviewing combat mechanics as they would apply to this ambush, we’ll talk about adjusting the encounter if you have more than 5 players or fewer than 4. Finally, we’ll briefly discuss whether you should run this encounter using a map and minis or in theater of the mind.

Active vs. Passive Perception

A character’s passive perception score is 10 plus their perception modifier. Passive perception is what a character notices when they aren’t actively looking for something. For example, let’s say the Goblins roll a 13 in stealth. This means that whoever has a 13 or above as their passive perception will notice the goblins regardless of whether or not the player deliberately mentioned that they were going to keep their eyes on the thicket covered embankments for a possible ambush.

If a savvy player catches on that this part of the road seems like a prime spot for an ambush, they may say something like “I want to look around to see if anyone is waiting for us behind those thickets” you can then ask them to make a roll. This gives the player a chance to roll a number higher than their passive perception. If they fail to roll higher than the goblin’s stealth roll of 13 but their passive perception is still 13, they will still not fail to notice the goblins because passive perception supersedes active perception by acting as a floor.

If a party member uses active perception successfully, reward that player by telling them that they “notice a silhouette behind one of the trees” and ask them what they would like to do. This gives them the chance to be the hero and alert the other players that enemies lay in wait. This way, none of the party members will be surprised when you roll initiative.

Before you start your session, it may be wise to go over the rules regarding active vs. passive perception with your players and write down each character’s passive perception for your own reference. It may also be helpful to describe a hypothetical situation for your players where active vs. passive perception is involved (like noticing traps) so that the players will know that they must make active perception roles if they want to get an extra edge in the game.

Surprise

If the goblins roll a 13 for their stealth, any character who rolled below a 13 for an active perception roll and who has a passive perception below 13 is surprised. If one party member made an active perception roll and succeeded, you can give them the chance to alert the party that they have company.

If a player is surprised, they can’t take any actions or move on their turn. It means their turn is essentially skipped on for the first round of combat. Some party members may be surprised, while others may not be. Surprise is determined for each player individually, not for the party as a whole.

Goblin Stealth and Other Tactics

One thing goblins like to do is shoot arrows from a hidden position. In addition to the initial stealth roll they make when they lay in wait for the party, they also have a bonus action which allows them them to hide after making an attack. A sneaky GM can have a goblin run to another tree and hide in the shadows after making their attack.

If the goblin manages to make a stealth roll higher than the passive perception of the target they are attacking, they will have advantage (roll 2 dice, pick the highest roll) on their next attack roll. If a character wants to try attacking a goblin that is hidden (shooting an arrow where they saw the goblin shoot from, for example) they can make a perception roll to determine if they can see their target. If their roll and their passive perception is lower than the goblin’s stealth roll, the player must make their attack with disadvantage.

For more on Goblin Tactics, I highly recommend reading this excellent article by Keith Amman. Following these guidelines will make this goblin encounter truly come alive.

Cover and Difficult Terrain

Be aware that Goblins will be ducking behind boulders and trees when they attack the party. When they do this, at least half of their bodies will be blocked by the obstacle. This effectively gives them half cover, which adds +2 to their Armor Class. Since goblins have a base armor class of 15, this means that players will have to make an attack roll of 17 in order to hit their mark. Fighters who can get up close to the Goblins will not have to reckon with the increased AC as they are engaged in melee combat.

Because the goblins are on an embankment, we can consider it difficult terrain. This means that a fighter wanting to close the distance between themselves and the Goblins will have to spend twice their movement to get up on top of the embankment. I would consider the embankment to be at least 5 feet of difficult terrain, which means getting on top of it would cost 10 feet of movement. A fighter who is more than 25 feet away from a goblin may not be able to reach a goblin on their turn. They can, however, hold an attack action which triggers when any goblin approaches.

Adjusting the Encounter for a Smaller or Larger Party

The Lost Mines of Phandelver Adventure is recommended for a party of four to five players. How can you adjust your combat encounters so that they aren’t too hard (if you have only three players) or too easy (if you have six)?

One handy tool that I used a lot when I ran Lost Mines was this Combat Encounter Adjustment Tool. This should give you a good idea what creatures to run for each encounter. The encounter adjustments for the goblin ambush listed below are taken directly from the tool.

A Party of Six (Or More?)

For parties with 6 players, consider trying out this combination:

  • 1 Goblin Boss (Monster Manual p. 166) with 22 hit points.
  • 2 Goblins with 7 hit points
  • 1 Goblin with 8 hit points

You could potentially run your game with 7 players or perhaps more, but this will often bog down your game and make it much less fun. Personally I consider 5 players to be the ideal number but you’ll learn what you prefer as a GM.

A Party of Three (or Fewer)

For a party of 3, try this out

  • 2 goblins with 6 hp
  • 1 goblin with 7 hp.

If you only have 2 players at your table, I recommend adding a sidekick to help balance your combat encounters. A sidekick can either be controlled by you or one of the players (I recommend a more experienced player). The Dragon of Icespire Peak Essentials Kit takes place in Phandalin and has some ready made sidekicks that you can add to your adventure (along with many side quests and magical items). You can also roll up a new character as a sidekick or use the Wizards of the Coast UA sidekick rules to create your own.

Use Kobold Fight Club

If you would like to be more creative with your encounters, you can use Kobold Fight Club to adjust them.

For example, if I have a party of four, kobold fight club tells me that the 4 goblins is a Deadly encounter (DEADLY means this is no joke. A player could die).

This image has an empty alt attribute; its file name is goblin-encounter.png
4 Goblins is a “Deadly” encounter for a party of 4 level 1 characters.

Perhaps I’m interested in doing a dragon related campaign and thus I would prefer kobolds to goblins for the initial ambush (kobolds are dragon servants). Kobolds are a bit weaker than goblins, so all we need to do is up the number of kobolds so we can make that a deadly encounter as well.

This image has an empty alt attribute; its file name is image.png
7 kobolds is approximately equivalent to 4 goblins

So it looks like we can run the ambush with 7 kobolds if we wanted to. In this example, you can see the “Adjusted XP” for the kobolds is a bit more than the 4 goblins. So it’s likely that 7 kobolds will be just a tiny bit harder than the 4 goblins, but not by too much. Personally, I’d go on the easier side for new players and go with 6 kobolds.

Again, I think that it’s better to use the Combat Adjustment Tool mentioned above as new GMs may not be familiar with the kinds of monsters they may have at their disposal. Also, as a new GM you’re already juggling a lot of plates, so it may be better to adjust the numbers and the hp of your enemies rather than the type.

Theater of the Mind vs Maps for the Goblin Ambush

The Goblin Ambush can run either in Theater of the Mind or using a Map. Theater of the mind can be exciting, immersive, and requires less setup than a map (although you may need to keep extra notes to keep track of player and monster positions). However, Theater of the Mind can also be confusing. Depending on how well you communicate the scene, players may not understand how close they are to the goblins or if they’d be able to attack more than one goblin with their burning hands spell. Many of the problems can be solved by following certain guidelines like those provided in Sly Flourish’s guide on running Theater of the Mind combat, but may require a bit of practice as a GM before you get it right. Also, players with aphantasia (inability to make mental visualizations) may have difficulty engaging in the scene, although a visual aid illustration of the setting as well as sharing an image of a goblin from the monster manual can help those with aphantasia.

Maps remove the confusion about distance and range, but also can turn the game into something less cinematic and something more like a board game. Players who enjoy D&D for the tactical aspect will often prefer maps. And oftentimes all you need to bring immersion back into the game is to describe key scenes. Maps can be simple, just a series of outlines drawn in marker on a dry erase battle map. They can also be shared online through a virtual tabletop like Roll20. Finally, if you want to invest some time and/or money you can get a digital display. The display pictured below costs about $1,000 (both for the case and the TV) and was created by Volo’s Workshop on Etsy.

Digital Maps are fancy, but do not necessarily make things more fun. Your players can have as much if not more fun with salt shakers on a table.

If you do decide to use a map for the Goblin Ambush, all you need to do is a quick google image search of Goblin Ambush Battlemaps and you should be set (Be sure to support creators on Patreon if you can!). If you’re printing the map, you may need to do some wrangling using a photo editor and excel to get it to scale. If you’re running this on Roll20 you’ll need to upload the image and align it to the grid.

Keeping Track of Combat Details: Initiative, Conditions, and Stats

I started writing some tips on how to keep track of combat details but it got rather long so I turned it into its own article. For more generic advice about running combat, check out “Tokens and Tables and Stats–Oh My!” Managing Combat in D&D.

What recommendations would you have for running the Goblin Ambush? Feel to leave your ideas in the comments!

Liked this article? Check out others like it in the DM’s Guide to Lost Mines!

Filed Under: Dungeons And Dragons, Lost Mines of Phandelver Guide Tagged With: Adjusting Encounters, Combat, cragmaw tribe, First Session, Goblin Ambush, Phandelver, Triboar Trail

Primary Sidebar

Hello! My name is Kenji Crosland and welcome to my blog. I recently spent nearly a year traveling the Southern US looking for a new home. I also write about how to run pen and paper RPGs. I also make AI Powered Game Master Tools. Say hello!

Currently Free Game Master Tools

  • D&D 5e Monster Statblock Generator
  • Dungeon Generator 2.0
  • D&D 5e Magic Item Generator
  • D&D 5e Encounter Generator
  • Worldbuilding Dashboard and Settings Generator
  • Location Description Generator
  • NPC Generator

  • Game Master Tools For $3 Patrons

    • Bookshelf Generator
    • Lore and Timeline Generator

    Game Master Tools For $5 Patrons

    • Dungeon Generator 2.0 -- Premium Version
    • NPC Generator -- Premium Version
    • D&D 5e Monster Statblock Generator -- Premium Version
    • Worldbuilding Dashboard and Settings Generator -- Premium Version
    • D&D 5e Magic Item Generator -- Premium Version
    • D&D 5e Encounter Generator -- Premium Version
    • GM Dashboard and Town Generator

    Legacy Tools

  • Dungeon Generator 1.0
  • Dungeon Generator 1.0 -- Premium version

Recent Posts

New Feature: Import-Export Functionality for Game Master Apps!

January 21, 2025 By Kenji

Introducing: The New and Improved Dungeon Generator 2.0!

December 10, 2024 By Kenji

Statblock Generator 2.0 Release!

July 11, 2024 By Kenji

Introducing Kenji’s RPG Setting Generator and Worldbuilding Dashboard!

May 19, 2024 By Kenji

Announcement: Adding Daily Usage Limits to Statblocks

April 15, 2024 By Kenji

Copyright © 2025 · Genesis Sample on Genesis Framework · WordPress · Log in